Fixed: pihole -up gives “Could not update local repository”

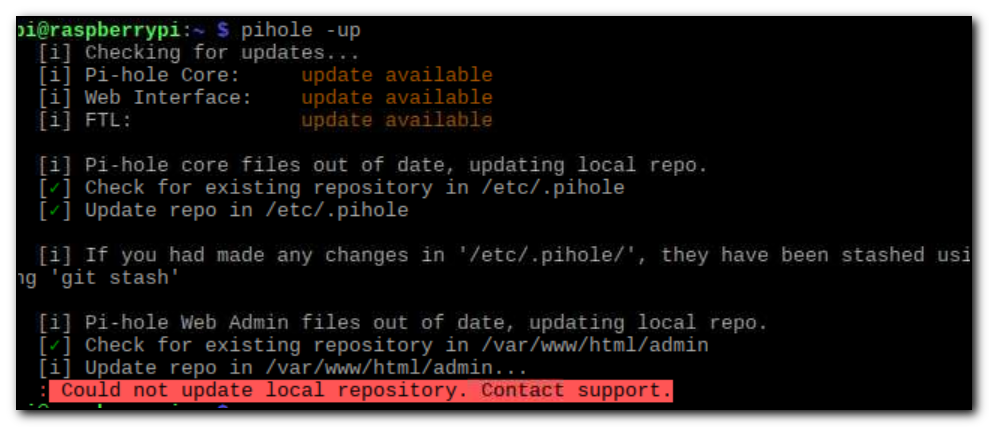
I received a notification on my pihole web console that it needed an update and the process is usually simple – log into the server and run pihole -up

However, this time I received the error “Could not update local repository. Contact support” – not very helpful.

pihole -up gives a Could not update repository. Contact support error messageReading several articles it seems that any change to the pihole files means the local git repository can get out of sync with the master repository and therefore cannot be updated. I had installed the bandwidth test plugin so I suspect that was the issue. As this plugin didn’t work it was not a huge problem resetting back to a vanilla install.
There were several articles on the pihole site and piecing a few of them together I came up with the following solution.

  cd /var/www/html/admin
  sudo git fetch –tags
  sudo git reset –hard
This gave me the following error:-

fatal: Unable to create ‘/var/www/html/admin/.git/index.lock’: File exists.

Another git process seems to be running in this repository, e.g.
an editor opened by ‘git commit’. Please make sure all processes
are terminated then try again. If it still fails, a git process
may have crashed in this repository earlier:
remove the file manually to continue.

Removed with the following

  cd .git
  sudo rm index.lock
Final update command and this time it completed successfully.

  pihole -up

This completes the install with 

Update Complete!

Current Pi-hole version is v4.2.2
Current AdminLTE version is v4.2
Current FTL version is v4.2.2

Fixed: PDF’s will not load over insecure http but will on secure https (if you have a Meraki firewall)

Had a weird issue this morning where pdf files that were served over http were getting blocked and would not load. Some sites also have https so we were able to just change the url to https and the file would then download.

After checking various browser settings I checked the Meraki firewall. By Disabling the Advanced Malware Protection (AMP) under Security/Threat Protection the files were downloaded successfully.
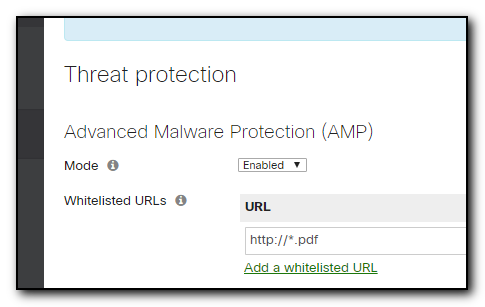
Instead of leaving AMP off, I then put a whitelist url of http://*.pdf and now pdf files load successfully with AMP still protecting the network.

Whitelisting pdf files in Meraki
Meraki pdf whitelisting

The frustrating thing is that AMP does not seem to be logged anywhere so it was not obvious that this was the cause of the problem. It also turns out that this has been a problem with AMP in the past as this 2 year old thread on Reddit shows!

Twitter only seems to have rudimentary support for Yubico keys?

I was fortunate enough to get a Wired Yubico key earlier in the year and a NFC key for Christmas that I can use with my phone. My intention was to use the new NFC key as my primary key with the Wired key as a backup key in case I lose all my keys or just the NFC key. This is the first in a series of enabling the keys to work with a variety of services. See my

I was originally hoping that I could also use the NFC key with my Surface Pro 2 so I would not have to keep plugging the key into the one usb port but apparently the Surface Pro does not support NFC.

Twitter:-

My first service that I setup was Twitter. I figured it would be fairly simple to setup and not earth shattering if I lost access to Twitter temporarily. By following the Two Factor authentication page on Twitter I had to jump through a couple of hoops to get it working. First I had to enable 2 Factor Authentication that defaulted to my mobile. Once this was enabled and I had verified my identity through an sms message I was then able to add a Security key. I plugged the NFC key into the USB port, pushed the button twice and I was successfully logged in. I was then able to add an authenticator app option and generate a backup key code in case I lose my key and then finally delete the txt authentication method as this is the 2nd weakness in the security chain (after poor password choice.

The Downsides

Unfortunately it seems that you can only use one hardware key with Twitter which means you have to not lose that original Yubico key! This risk can be mitigated by having a 2FA app on your phone and also saving the backup key somewhere safe – I use Authy for the Key generator and keep the backup code in Lastpass and tag each site entry with #2FA so I can easily search Lastpass to find all the sites that require 2 Factor. I’ve also added #2faNFC to keep track of which key is used for which service.

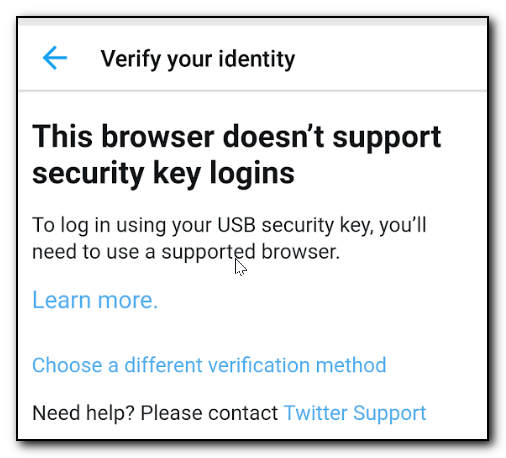
The other downside is that it appears that the Twitter mobile client for Android does not support hardware keys and generates a “This browser doesn’t support security key logins” error message.

Twitter login prompt failure when using a hardware key on a mobile device.

It appears that only desktop pc apps using a browser can support the USB Hardware keys – hopefully this will change in the future as hardware keys get more and more popular. For the mobile login, select “Choose a different verification method” and then use the authenticator app option.

I also have to come up with a way to make the key easy to plug into the laptop(s) – the surface only has one USB port (with a docking station attached) and reaching around to a docking station to plug in a key will get annoying pretty quickly. I think I’ll be getting a USB extension cable that it can be plugged into.

As mentioned earlier, this is my first experience with the hardware key. It was easy to setup but just a little frustrating that the new NFC device can’t be used on a mobile (for Twitter at least).

Have you used a hardware token such as a Yubikey? Please et me know in the comments below!

Fixed: Scheduled automation task in Azure to start virtual machines does not complete successfully.

I use Azure’s automation accounts to stop and start virtual machines when they are not needed. One of our machines is used to host backups and is only used for a limited amount of time during the day when the backups run so it is shut down automatically after the backups have completed. 

Recently I ran some cleanup on my Azure subscription to get rid of some old test machines and in doing so removed one of the machines that was listed in an exclusion list of machines that should not be started or stopped (as I did not want this obsolete test machine starting on a daily basis).

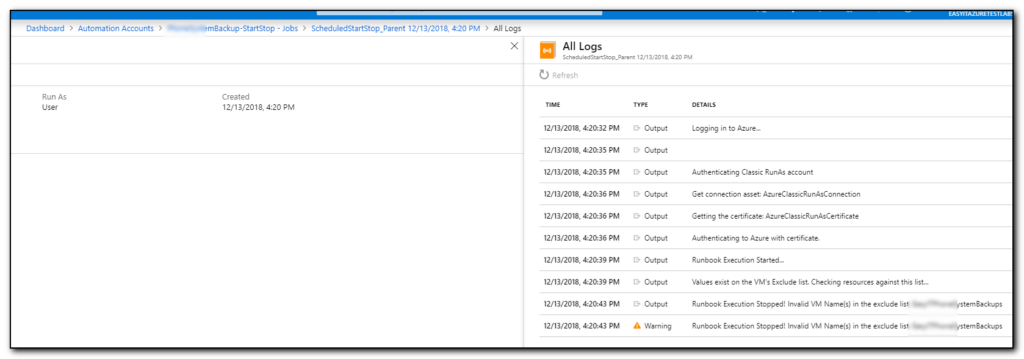
Navigating to the Dashboard / Automation Accounts / Jobname / Scheduled Job/All logs shows that there is an invalid computer name.

Navigating through to Automation Account logs

It turns out that removing a machine from the Azure inventory but still keeping it in the VM’s exclude list actually stops the entire script from running.  Short term fix is to remove it from VM’s Exclude list and the machines start to run again.  The long term fix (one day) is to continue if the Exclude list contains invalid servers.

Fixed: Failed_To_Auto_Discover_Domain error shows up when trying to administer Microsoft Teams in Office365

A week or so ago I was trying to administer a new Office365 Tenant in preparation for an Office365 migration. Part of the process is to configure the various services to reduce the security risk due to unauthorised sharing of files etc.

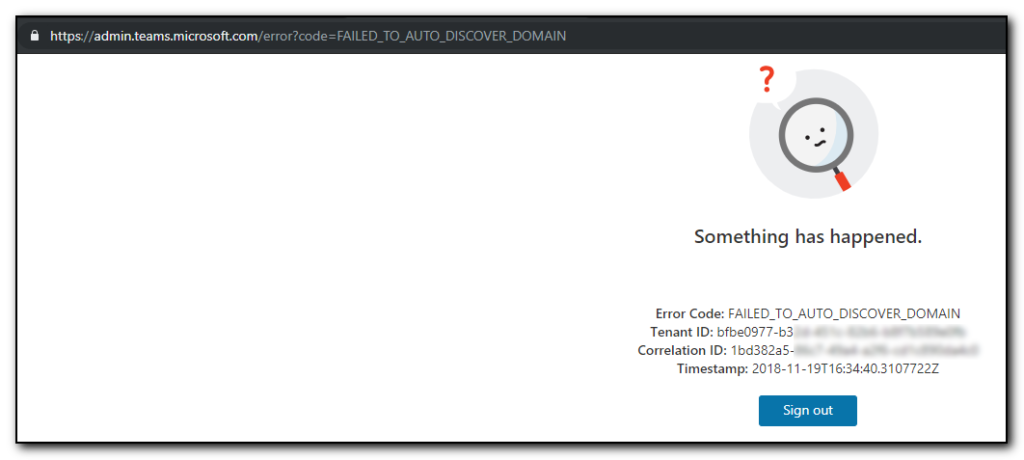
Attempting to log into the Teams admin interface gave me the worst error message of “Something has happened” when clicking on the Teams admin link as per the screenshot below. Not only is the Error devoid of anything useful but it’s inaccurate as actually *Nothing* has happened.Something has happened.  Failed_to_Auto_Discover_Domain. Error message when trying to administer Teams without a licence

The error code FAILED_TO_AUTO_DISCOVER_DOMAIN was misleading – it has nothing to do with the autodiscover record.

It turns out that the admin interface for Teams only works if you have at least one user with a Teams licence.  I didn’t have any as this was a new Tenant and the only users in the system are currently Global Admins that don’t have any licences assigned to them.  Once a licence was applied and 5 minutes had gone by (with a successful Teams login) I was then able to login and make the required settings.


Review: The Forbidden Door by Dean Koontz – Jane Hawk #4

The Forbidden Door (Jane Hawk, #4)The Forbidden Door by Dean Koontz
My rating: 3 of 5 stars

The fourth book in the Jane Hawk series is definitely one that should be read after the others. This could be read as a standalone novel (and indeed the first few pages are a recap) but it would spoil the fun if you later decided to go back and read the first few.

I have the book 3 stars as the beginning of this book felt really stilted due to being written in a weird third person tense that jarred as it attempted to tell the story and it just felt like it was interrupting all the time.
The latter part of the book did not have this issue so I was finally able to enjoy the last part of the book.
Note there is a lot of violence in the book and lots of extreme methods of dying so stay away if squeamish, however it does help to paint the dark, screwed up world that would occur when mind control is used for bad purposes and when things go wrong….really wrong.

The ending was very abrupt and almost felt like it was in mid plot. The Kindle version does have the first couple of chapters for the next book but I didn’t want to read those until the entire book comes out.

Thanks to Netgalley for the ARC copy of this book.
You can get your own copy from your book retailer September 11, 2018.

View all my reviews

Workaround to Dreamhost stopping the support of catchall emails by using Gmail and scripts

About 3 months ago, my hosting provider Dreamhost announced that it was stopping the support of catch-all email addresses claiming that this was to reduce the server load and improve antispam features.
Unfortunately this is a feature that I rely on heavily as I always provide unique email address’s to companies such as companya@ or companyb@ so that I can filter out emails into different labels, blacklist a spammer and lastly see who has had their website compromised and leaked or sold my email address to someone else. I’ve had at least two email addresses, one of which was a local government agency, start to be used as a spam destination. Unfortunately it is frustrating when I report it to the company and they deny it has happened even though I’ve shown them headers of the email address after the initial contact to let them know they have been compromised. One of the companies I contacted denied they had been breached and I hadn’t even provided them the email address so I knew they hadn’t looked very hard!

Anyway….that is all now over as Dreamhost no longer provide this option.

The solution I am using is as follows:-

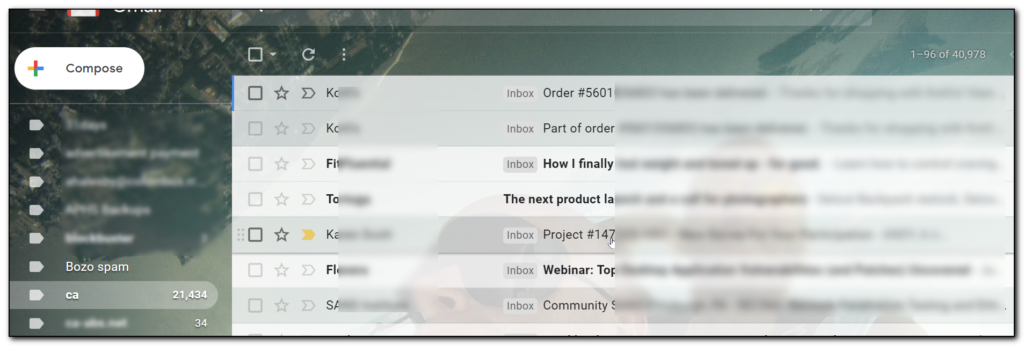
  • Use gmail as the primary interface for email (No change since I got gmail back in 2005ish)
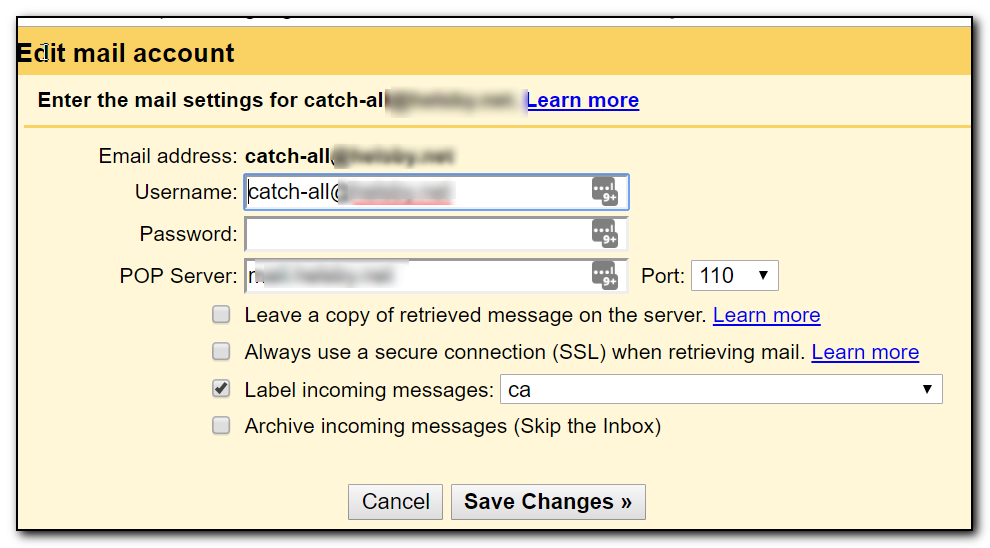
  • Use gmail pop3 access to pull in the original catch all email and apply a “ca” label to the email (No change)
  • Use Google Sheets to analyze email and retrieve email address used
  • Create a list of incoming emails and destination email addresses
  • Add emails to Dreamhost control panel

If you wish to continue using the email addresses you can either add them as an alias or set up a forward for the email address. I was previously using the catchall mailbox and had gmail setup to retrieve the email on a regular basis.  The upside of this was that I didn’t have to do anything after setting up the pop account in Google. The downside is that I would have to wait for Google to poll the email account, or go to the accounts tab and pull the mail down manually if I was using a computer. The tablet/mobile access did not provide the ability to “check for mail now”

I had also setup gmail to label all mail retrieved from this catchall account with “ca”. This shows up in the google interface and can also be filtered/searched on.

This meant that I already have email in my gmail account. If you haven’t done that already and wish to use these instructions, then  set up gmail to pull in the email as a pop3 account.

Once you have all email coming into Google I then used a slight modification of Helge Klein’s spreadsheet that lists all email address’s for a single label. Use the provided link to copy the sheet into your own Google Drive account. Select the Tools menu, Edit script and review the script to make sure it’s not malicious.

Around line 45 will be the text

var mailFrom = messages[i][j].getFrom ();

Replace this with

var mailFrom = messages[i][j].getTo ();

Yes I know the variable name doesn’t make sense, but this is the easiest way to quickly change the code. The neater solution is to then search and replace mailFrom with MailTo

Save the document and then use the text “ca newer:2017/12/31 older:2018/09/01” (without quotes) in B2in the sheets document. Obviously adjust the dates as appropriate.Sheets label to search for emails in 2018

Note that I found that if my date selection was too large the script would time out. Depending on how many emails you have in gmail, I would probably filter out a year at a time. The filter syntax you enter into the B2 field is the syntax you would use to search in gmail.

Once you have your filter, selectHK Scripts/Extract email addresses.

Hopefully all goes well and you now have a list of emails that were sent to your catch all address in a new tab.

The neat thing is that you can run the script multiple times and each search result will generate a new tab. This way you can run this periodically to capture mail received each month. The caveat is that you do need to keep emails with the ca label in your gmail for at least a month!

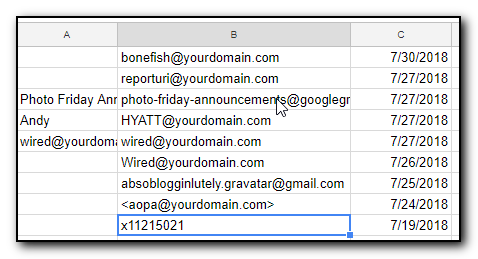
The screenshot below shows a few results from this search.

Note that I do have a couple of oddities in this result (which is why I included them). There are a couple of email address’s that go to my catchall address but the emails were not forwarded to my original domain. My gravatar email address is actually another gmail address forwarded to a catch all address. As the original TO field is not my domain it doesn’t look quite right. Some other oddities have included google groups targets or some other nefarious/badly formed bcc emails. These should be treated as an exception and handled manually (outside the scope of this document.


L:ist of catch all email addresses used

Grab the contents of column B and save to a new tab – this new tab will be used to split the email addresses into a format suitable to paste into Dreamhosts mail control panel.

I then did the following to parse the email address into a useable format. Note that this may not be the most efficient but it gives me the ability to easily verify each stage rather than debug a complicated excel formula.

The screenshot below shows what it should look like when completed. (The two shaded rows are the odd ones that I deal with manually)Spreadsheet of email addresses ready to paste into Dreamhost

Column A should be your original To field. The other cells are filled out as follows. Note you need the starting = sign to signify a calculated field.

D   =split(A1,“@”)

E – not used.

=” yourgooglealias+” & D1 & “@gmail.com”

Note there is a space at the start of G as this is used as the separator in the next step.  Yourgooglealias is the bit before the @ sign in your gmail address

=(substitute(substitute(A1& G1,“<“,“”),“>”,“”))

This replaces any chevrons that may be around the email address and then takes the original email address, adds a space and then adds the new gmail address where the alias now becomes +alias.


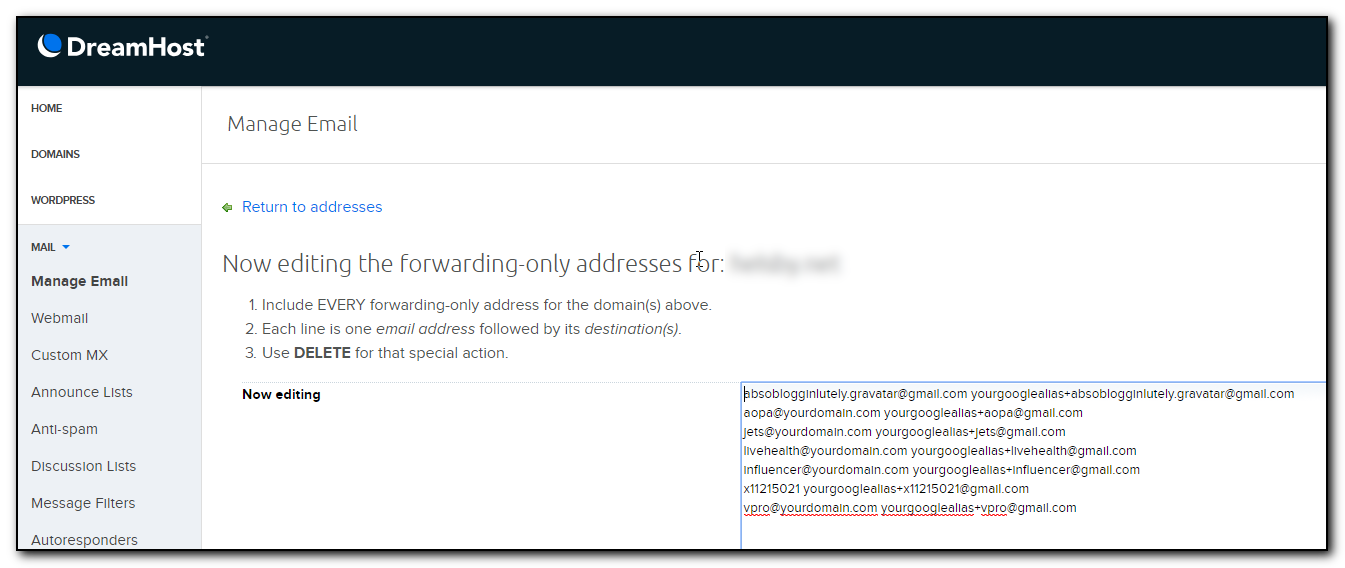
Finally, copy the contents of column K into dreamhosts control panel. https://panel.dreamhost.com/index.cgi?tree=mail.addresses&current_step=Index&next_step=Bulk should hopefully work but make sure you are pointing to the right domain!

Select Mail, your mail domain, Forwarding Only/Edit All.

Pasting emails into Dreamhost

Hit the save button and you are done.

Your email should be quickly delivered to gmail and still easily filtered out based on the to field.

The downside is that there are still some webforms out there that do not recognise the + character as valid in the email address. Spammers can also easily work out what your main email address is and send directly to that mailbox.


Please let me know if you have any questions or comments


Powershell oneliner to check network connections used on current machine based on Mike Robin’s blog post

Mike Robins had a nice tip yesterday about using powershell to see what your system is talking to and I thought I would tweak it slightly to potentially make it even more useful.

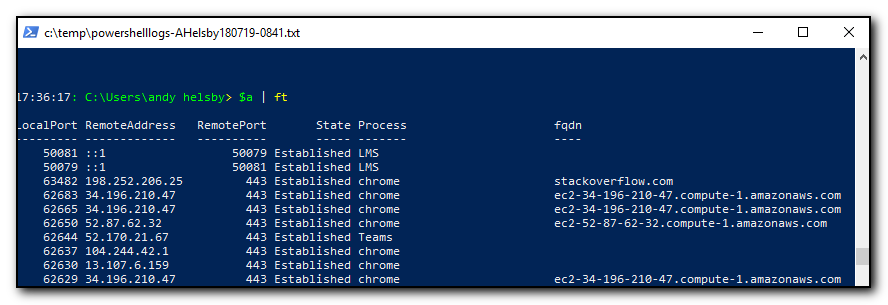
When I ran the command on my machine it took a while to run and I also thought it would be nice to tweak it so that the machine does a reverse dns lookup to retrieve the host names that the system is talking to. This might provide an indication of whether the connection is good or not.

I saved the output of the command to a variable so if I need to tweak the display output I can do so easily without running the script again.

$a=Get-NetTCPConnection -State Established | `
Select-Object -Property LocalPort, RemoteAddress, RemotePort, State,`
@{name='Process';expression={(Get-Process -Id $_.OwningProcess).Name}}, `
@{name='fqdn';expression={([System.Net.Dns]::GetHostByAddress($_.Remoteaddress).Hostname)}},`
 CreationTime
$a

This is a very quick and dirty hack and takes ages to run on my computer. It probably doesn’t help that I have a ton of chrome tabs open which will require a lot of dns lookups and several of them are the same host but this method will lookup them all up individually. IP  and dns lookup on active network connections


Yes, I split this ‘one-liner’ into multiple lines to make it easier to read on the screen but if you have to do that, then it’s not really a one-liner and even more so if you are unlikely to remember it.

Office365 Exchange Control Panel now has command logging for admins.

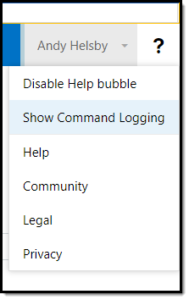
Help Button, Show command logging.One of my annoyances with Office365 administration tasks was that I could make changes to the interface but had no idea what commands were being run behind the scenes. This made creating scripts a frustrating trial and error attempt at finding the correct verbs to run.
However, this morning I stumbled under the Help/Show Command Logging option in the admin panel. This is similar to the Show command output that was available in the Exchange 2010 admin console that I used extensively in the good old on-premise days.

I have no idea how long this has been here but it really made my day.

Now if only the rest of the Office365 admin panels had the same functionality.

Book Review – Lies by T.M. Logan

LiesLies by T.M. Logan
My rating: 4 of 5 stars

T.M. Logan was a new author to me that I came across on Netgalley who gave me an arc version of the book for my review.
Overall I enjoyed the book but the first part seemed a bit tedious with all the dialog and very short chapters that seemed to interrupt the flow of the book.
However as the mystery and lies unfolded, the book got easier to read and the plot twists suck the reader deeper into the story.
I didn’t suspect the ending twist but it did seem plausible enough.
A good, reasonably quick summers read that would be perfect for the beach.

View all my reviews