Tag Archives: fixed

Fixed: No passkeys on this device – allowing Passkey support in Android Edge and Keeper

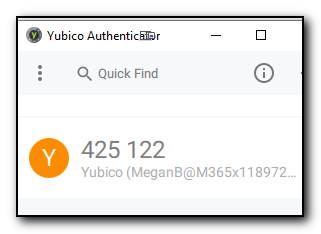
Dialog box in Edge on Android 14 that shows passkeys set to 3rd party management

With the growing increase in Passkey usage on websites, it’s getting pretty important to be able to synchronize these between devices. I have at least two computers and two mobile devices that I’d like to be able to sign into a passkey enabled website with the same method rather than using passkeys on one device and username/password on the other.

Keeper has had passkey support for quite a while now, but up until recently, the ability to synchronize to an android 14 device has not worked and in my case, I would get a Google popup that stated, “No passkeys on this device.”

The Keeper instructions show that the M124 flag needs to be updated. However, I found that following those instructions as a base but going to edge://flags and then searching for edge://flags and then searching for Android Credential Management for passkeys, the drop down box allows the selection for Enabled for 3rd party passkeys. Selecting this, I was then able to use the previously saved passkeys in Keeper.

A good site to test this is passkeys.io as this is just a demo site with no secure data that you might end up losing if the passkey doesn’t work – after all you probably don’t want to test this with your email provider! The bonus is that you can use a random mailinator.com email address to test this without providing your real email address.

One of my banks now supports Passkeys – My main bank is unfortunately way behind the curve and doesn’t even support TOTP passwords unless you have a business account with their MFA typically being a SMS text although sometimes they send a push notification to the app on my phone. It’s odd that they don’t understand it is way more secure to use TOTP or push notifications but you should be doing this consistently rather than about 25% of the time.

Streamdeck is now finally working with Teams

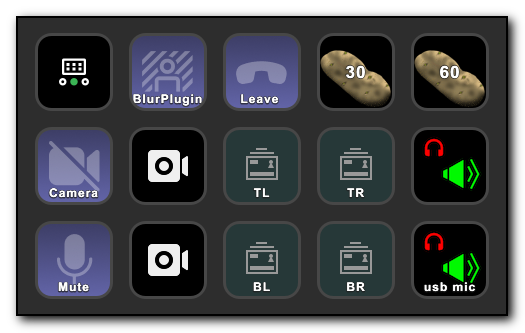
Screenshot of Elgato's Streamdeck buttons showing microphone, blur plugins and camera view

TLDR – set the api key whilst having a meeting with yourself

I was fortunate to get a Streamdeck for a birthday present back in March this year – the announcement that it was integrated into Teams was the final push to get one. I had been debating whether to get one or not and had been using TouchPortal as a software solution running on an old Kindle as test bed for quite some time to see how much I would use this functionality. The answer is a lot!

(Very) Shortly after getting the device and setting it up, the Teams plugin was pulled from the store but eventually re-released and it has never worked since. If I was lucky it would intermittently work for 5 minutes or even 20 if there was a blue moon, I was wearing my lucky jumper and there was a z in the day’s name.

Other people have also had the same problem and there has been a long thread on the elgato subreddit about the issue with various solutions provided but none of them have worked for me, at least on a consistent basis.

However a post yesterday on the Microsoft community forums had someone getting the plugin working with the new Teams version. I followed the steps and the issue was still not working for me – however it did give me a clue.

This morning I confirmed that the WebSocket was listening on port 8124 with netstat -aon | find “8124” and was fiddling around trying to get the plugin to work. I had already confirmed the api key (found from Settings/Privacy in Teams and pasted it into the plugin settings and was still getting the lock icons, but this morning I selected the calendar, “Meet now” option and started a meeting with myself. (It was very early and there was no one else to call!)

After the meeting was established, I opened the plugin and re-entered the api key in the button settings and this time the setting worked, all of my buttons had the padlock overlay removed.

Fearing the worst, I killed the meeting, restarted Teams and Stream Deck, and all the buttons are still working. Being the optimist, I then rebooted the computer, restarted Teams and Stream Deck and the buttons still work. 2 hours later and the buttons are *still* working.

For those interested, the TL, TR, BL, BR refer to the monitors attached to the desktop computer and enable me to quickly switch the OBS camera to the relevant monitor. Using the classic Teams app allows me to share a video feed from a camera so all I have to do is share the one video stream and let OBS and Streamdeck take care of everything else. Unfortunately, the New Teams does not have this functionality and the OBS output screen needs to be shared which requires way more key presses to setup and the OBS output running on one of the monitors, so until this shows up in the New Teams application, it’s Teams Classic for me.

Solved: “No row was found with id” when selecting row from Excel with Power Automate

I’ve been trying to automate the manipulation of incoming emails from an unnamed source that contains the users first and last name but not their email address and then send an email to that person.

Unfortunately, I am not able to compose an email address based on the first letter of their first name and full surname along with the domains as the domains could be different (and the naming convention too).

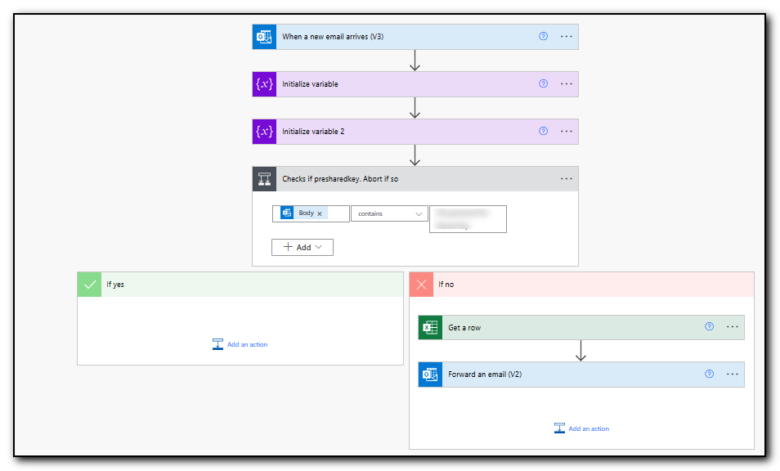
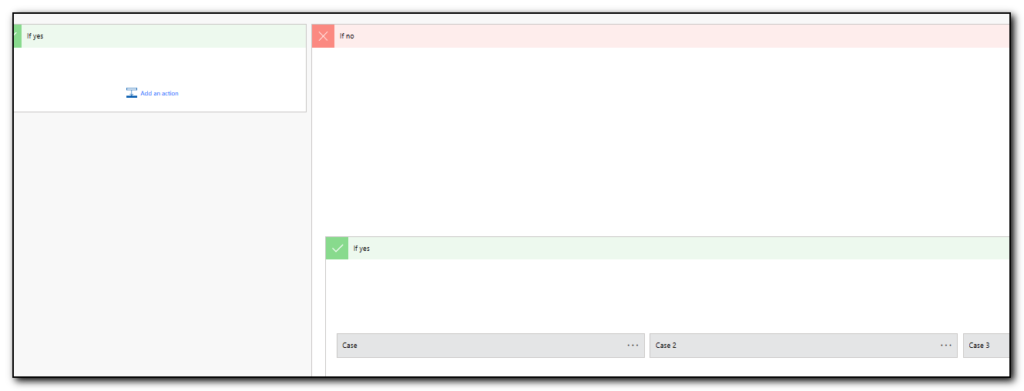
I was initially doing this with a case statement in Power Automate which is very ugly, inefficient and pretty laborious to set up and I also found out the hard way that there is a limit to the number of Case statements you can have – 25 in case (pun intended) you are wondering.

Don’t do this – it’s ugly, inefficient and hard to manage.

Spent some time today to switch to an excel lookup that will grab the first and last name from the email and then pull back the email address that should be used in Excel. However, it kept returning the error no row was found with id ‘First Last’ even though there was only one row with the value of ‘First Last’

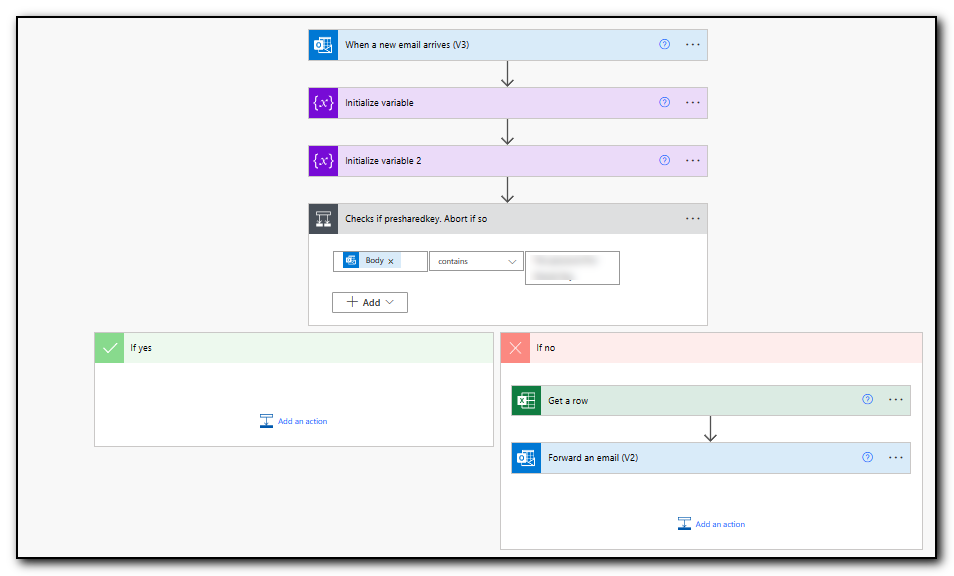
The issue was that I had created a table in Excel for all of Column C through E and this includes lots of empty lines that the Get a row command will choke on. Fixed by defining the table in Excel to only contain the actual data that I needed such as $C$1:$E$80, Power Automate now only returns one value and the script continues on successfully.

Power Automate flow to read email, set some variables and send an email out

Fixed: Installing SQL Server Reporting Services (SSRS) prompts for key

Had an odd experience attempting to install SSRS on a 2019 SQL instance the other day where the software kept asking for the install key to install. Unfortunately I did not take a screenshot but after starting the install progress it asks for a key and refuses to take the key provided.

Other search results state to just enter the key that is obtained by either trying to reinstall SQL and grabbing the key that is displayed during the setup process or by grabbing the key from the extracted 2019\x64\defaultsetup.ini file in the SQL source folder (not the SSRS Install folder).

This didn’t help as the key was reported as being incorrect.

Using dbatools I figured I would try installing from the commandline to see if I would get any better troubleshooting logs. Attempting to install SSRS with the fantastic dbatools module with a -whatif parameter gave me a warning that the server was pending a reboot.

install-dbainstance -Feature reportingservices -path e:\sql2019\source\ -version 2019 -instancename localhost -whatif

Rebooted the server and the key was then taken on the subsequent installation attempt.

Not sure why the install just keeps asking for the key rather than displaying “You need to reboot”

SQL, dbatools and Webroot

I have been busy working on a SQL server migration, and have come across a couple of issues.

Firstly, attempting to install or upgrade an SQL instance with Webroot on the machine generates an unauthorized action on the machine. Reviewing the error logs provides the following error

Exception type: Microsoft.SqlServer.Configuration.Sco.ScoException
Message: 
Attempted to perform an unauthorized operation.
HResult : 0x84bb0001
FacilityCode : 1211 (4bb)
ErrorCode : 1 (0001)
Data: 
WatsonData = Uninstall@{145996FC-8E6B-47AB-BEA5-A84F12B72AF5}

Navigating to HKEY_LOCAL_MACHINE\SOFTWARE\Microsoft\Windows\CurrentVersion\Uninstall registry shows the value {14599…..} is Webroot. Set server into unmanaged mode and then removing Webroot then enabled me to install SQL service packs.

I’ve also run into the same issue on new installs which leads me to the second issue.

I’m using dbatools to install with notes taken from the newly printed dbatools in a month of lunches. A book I purchased pre-pandemic and promptly forgot about but I finally got my hands on the book.

dbatools is a fantastic resource for SQL admins who want to automate everything and a common task is installing SQL.

Unfortunately there’s a typo in Listing 13.6 and 13.7 The parameter SQLUSERDBDATADIR that is coded into the sql config.ini file should actually be SQLUSERDBDIR

It took me a while to figure that one out. I then went to check out the books online only to find someone had found and reported the same error – yesterday!

The moral of the story is to check the books online first.

Also, whilst looking at my Manning books – I have a Powershell problem (or maybe with all these books I don’t!

Listing of Powershell books from Manning Publications

Fixed: 161008 The source virtual machine doesn’t have a network interface or all the network interfaces were deleted when using Azure Migrate

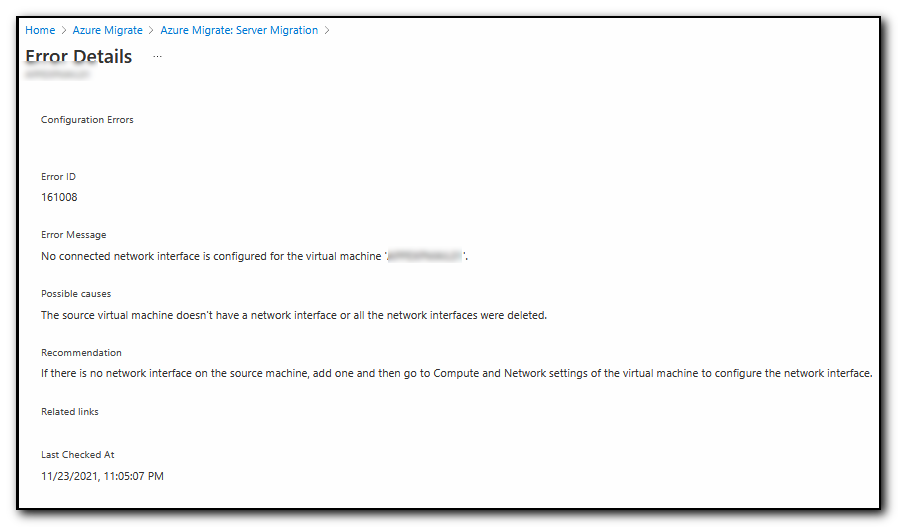
I’ve been working on an Azure Migrate project at work this week and had an interesting issue after attempting to start a replication of the source servers. The configurations were brought in from the Azure Migrate assessment tool but I received an odd error that there was no connected network interface on the source server.

This is a very strange error as all the source servers do have network interfaces otherwise there would not be much point in migrating them up to Azure! The error id 161008 and messages of “No connected network interface is configured for the virtual machine” and “The source virtual machine doesn’t have a network interface or all the network interfaces were deleted” did not make much sense, however the recommendation of “If there is no network interface on the source machine, add one and then go to Computer and Network settings of the virtual machine to configure the network interface” was a slight clue.

error id 161008 and messages of No connected network interface is configured for the virtual machine" and The source virtual machine doesn't have a network interface or all the network interfaces were deleted

Part of the solution steps imply that you create a nic on the server, but as the server has not actually been created in Azure yet, this step is not possible and the source server obviously has nic’s already setup so no change can be made on that server.

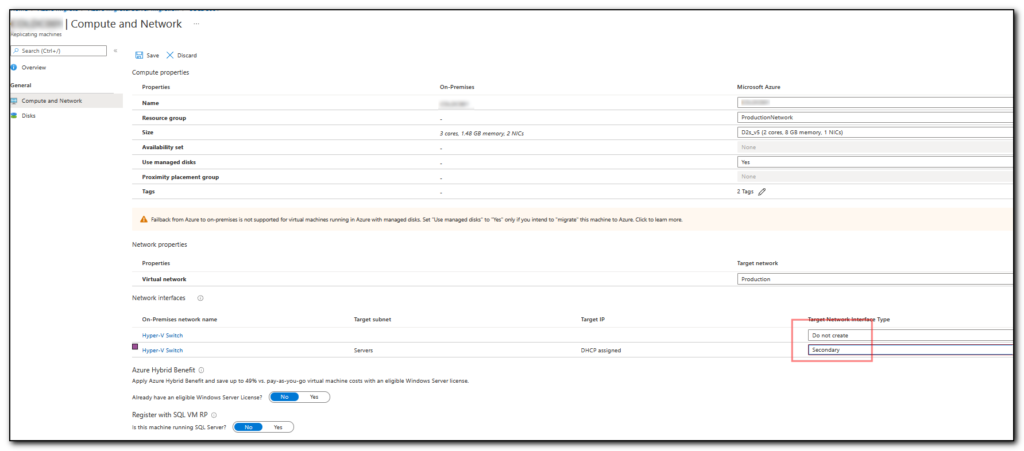
After getting a second pair of eyes on the issue (Thanks A!) , we had an Aha moment in the Compute and Network section of the server setup. The Assessment had set the nic’s on the machine to Do not Create and Secondary Network. As there was no primary nic configured on this page, the error message above is generated. Setting the Secondary nic to Primary rather than Secondary enabled the replication to start successfully.

Screenshot of configuring Compute and Network for an Azure migrate server

2 lessons from this – Always ensure you have a primary nic configured when using Azure Migrate. Get a second pair of eyes for that fresh look at the problem as sometimes you just can’t see the wood for the trees.

Fixed: The Active Directory schema isn’t up-to-date, and this user account isn’t a member of the ‘Schema Admins’ and/or ‘Enterprise Admins’ groups.

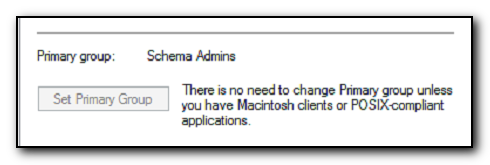
Setting Primary Group to Schema Admins

Attempting to run an Exchange CU update on a server this morning and the server kept giving “The Active Directory schema isn’t up-to-date, and this user account isn’t a member of the ‘Schema Admins’ and/or ‘Enterprise Admins’ groups” error message when attempting to run setup.exe /Prepareschema /IacceptExchangeServerLicenseTerms as a pre-requisite installation step. My user account was a member of both of the groups but the error still occurred.

Changing the accounts primary group in Active Directory by selecting the Member Of tab and then selecting the Schema Admins group and selecting Set Primary Group, logging off and back on again led to the setup process completing successfully.

Don’t forget to set it back after the installation has completed.

Fixed: ScreenConnect / Control missing from Labtech / Automate

Automate screenshot

For the past two days my Automate window was missing all of the Screenconnect plugins that allow one click remote access to client machines. Both the one that shows at the top of the computer list and also when the machine window is launched. (Screenshot below shows how it should look)

Screenshot showing the control icon in Automate for computers

A reinstall of the software (including renaming the left over Labtech files in Program files and Program Data after removing the software) did not fix the issue.

However, reviewing the C:\ProgramData\LabTech Client\Logs\yyyymmdd_LTcErrors.txt showed lots of plugin exceptions including the following:-

An attempt was made to load an assembly from a network location which would have caused the assembly to be sandboxed in previous versions of the .NET Framework. This release of the .NET Framework does not enable CAS policy by default, so this load may be dangerous. If this load is not intended to sandbox the assembly, please enable the loadFromRemoteSources switch. See http://go.microsoft.com/fwlink/?LinkId=155569 for more information

Following that link provided the hint that loadFromRemoteSources needs to be enabled.

Editing “C:\Program Files (x86)\LabTech Client\LTClient.exe.config” and adding <loadFromRemoteSources enabled=”true”/> just before the /runtime> line, Automate now includes the control button.

LTClient config file showing the loadfromremotesources element

Fixed: Lastpass seems to randomly add incorrect data to Forms.

We use a web based documentation system at work and have had a couple of instances where data for companies (ie Company X) seems to have been randomly edited in forms to include data from another form (ie Company Y) in the system. In a form that had a username, password, url and notes field we discovered that a tech could go in and edit the notes (and only the notes field) and without realising it, the username and password were also being updated in the form. The tech would hit save and now the saved password was incorrect.
Thankfully the documentation system has revision histories to allow us to revert back to the previous settings. but it is still a painful process to go back and review recent changes to see which ones were genuine edits and which were changed incorrectly.

We initially blamed it on LastPass filling out data as the issue would not occur if we disabled LastPass, however a search in LastPass would not return the data that was being added to the form. It took us a while to track down, but Chris, one of our techs worked out what was going on.

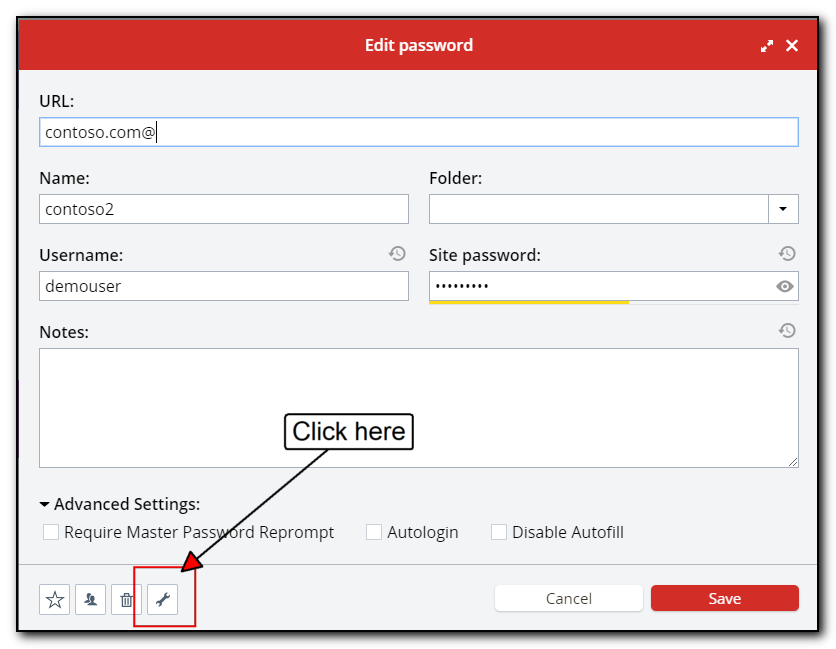
Sample lastpass password screen with extra field button highlighted

LastPass has additional fields that don’t show up when you browse (and apparently search) and the data from these extra fields were automatically being filled in for some reason. Click the wrench, highlighted in the above screenshot to see the extra hidden fields.

Our solution was to delete these extra fields, save the record in LastPass and we no longer have LastPass corrupting our data.

Fixed: NPS using Azure AD not prompting for 2 factor on phone

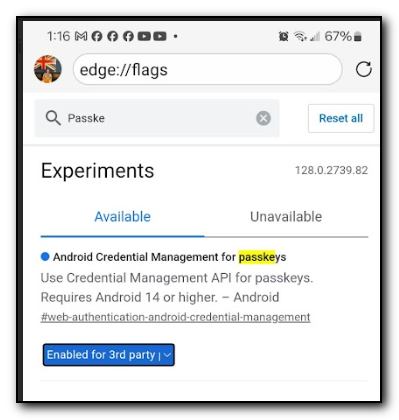
Screenshot of Yubico numbers for 2FA verification

We were recently came across an issue with configuring the NPS (Network Policy Server) to use Azure AD’s 2FA authorization to validate VPN access to one of our clients. The initial configuration was fairly straightforward with the instructions at https://docs.microsoft.com/en-us/azure/active-directory/authentication/howto-mfa-nps-extension but after connecting to the VPN server, we were not getting the push notification to our phone for the final verification steps.

Going through the Network Policy Server logs in event viewer we saw an error message as follows ” NPS Extension for Azure MFA: CID: 341b704d-03f1-4ba6-ae92-eb19ae2f2bf3 :Exception in Authentication Ext for User myusername :: ErrorCode:: CID :341b704d-03f1-4ba6-ae92-eb19ae2f2bf3 ESTS_TOKEN_ERROR Msg:: Verify the client certificate is properly enrolled in Azure against your tenant and the server can access URL in Registry STS_URL. Error authenticating to eSTS: ErrorCode:: ESTS_TOKEN_ERROR Msg:: Error in retreiving token details from request handle: -895352831 AADSTS7000112: Application ‘981f26a1-7f43-403b-a875-f8b09b8cd720′(Azure Multi-Factor Auth Client) is disabled. “

The key was the last line – Azure Multi Factor Auth Client is disabled. Despite the fact that 2FA was already in use to verify access to the Office365 portal and desktop apps, it seems that the client was not enabled in Office365.

This was fixed by running the following in a powershell window connected to Azure AD..

Set-MsolServicePrincipal -AppPrincipalId “981f26a1-7f43-403b-a875-f8b09b8cd720” -AccountEnabled $True
Set-MsolServicePrincipal -AppPrincipalId “1f5530b3-261a-47a9-b357-ded261e17918” -AccountEnabled $True

This then enabled 2FA to work with NPS. I put in a PR request to the official documentation to have this as an official troubleshooting step but the PR was closed. Hopefully this post and the PR will help others in their configuration as it did seem to be a fairly common problem.