Email

Workaround to Dreamhost stopping the support of catchall emails by using Gmail and scripts

About 3 months ago, my hosting provider Dreamhost announced that it was stopping the support of catch-all email addresses claiming that this was to reduce the server load and improve antispam features.
Unfortunately this is a feature that I rely on heavily as I always provide unique email address’s to companies such as companya@ or companyb@ so that I can filter out emails into different labels, blacklist a spammer and lastly see who has had their website compromised and leaked or sold my email address to someone else. I’ve had at least two email addresses, one of which was a local government agency, start to be used as a spam destination. Unfortunately it is frustrating when I report it to the company and they deny it has happened even though I’ve shown them headers of the email address after the initial contact to let them know they have been compromised. One of the companies I contacted denied they had been breached and I hadn’t even provided them the email address so I knew they hadn’t looked very hard!

Anyway….that is all now over as Dreamhost no longer provide this option.

The solution I am using is as follows:-

  • Use gmail as the primary interface for email (No change since I got gmail back in 2005ish)
  • Use gmail pop3 access to pull in the original catch all email and apply a “ca” label to the email (No change)
  • Use Google Sheets to analyze email and retrieve email address used
  • Create a list of incoming emails and destination email addresses
  • Add emails to Dreamhost control panel

If you wish to continue using the email addresses you can either add them as an alias or set up a forward for the email address. I was previously using the catchall mailbox and had gmail setup to retrieve the email on a regular basis.  The upside of this was that I didn’t have to do anything after setting up the pop account in Google. The downside is that I would have to wait for Google to poll the email account, or go to the accounts tab and pull the mail down manually if I was using a computer. The tablet/mobile access did not provide the ability to “check for mail now”

I had also setup gmail to label all mail retrieved from this catchall account with “ca”. This shows up in the google interface and can also be filtered/searched on.
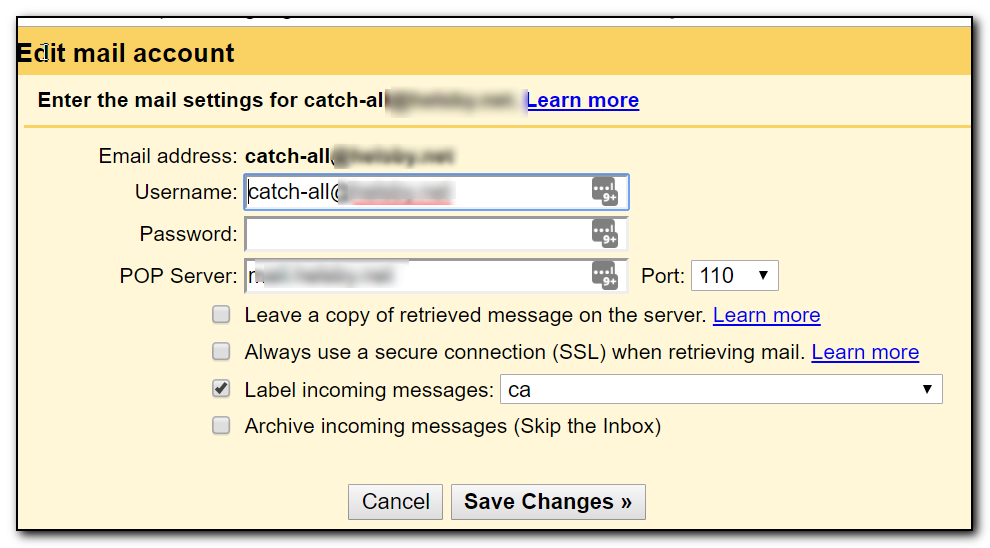
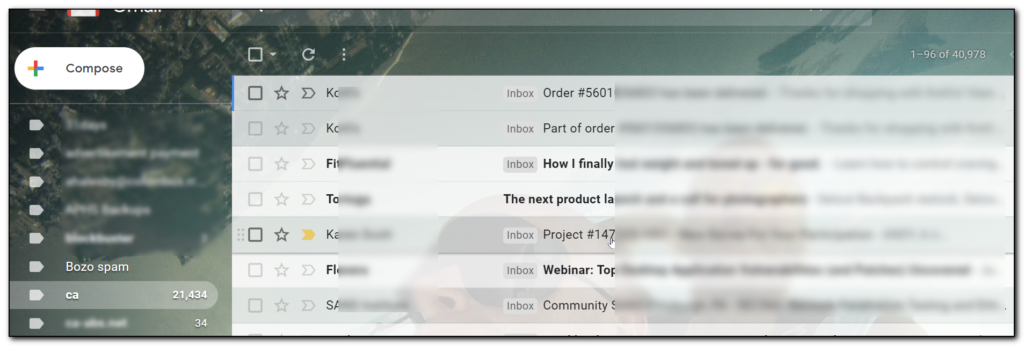
This meant that I already have email in my gmail account. If you haven’t done that already and wish to use these instructions, then  set up gmail to pull in the email as a pop3 account.

Once you have all email coming into Google I then used a slight modification of Helge Klein’s spreadsheet that lists all email address’s for a single label. Use the provided link to copy the sheet into your own Google Drive account. Select the Tools menu, Edit script and review the script to make sure it’s not malicious.

Around line 45 will be the text

var mailFrom = messages[i][j].getFrom ();

Replace this with

var mailFrom = messages[i][j].getTo ();

Yes I know the variable name doesn’t make sense, but this is the easiest way to quickly change the code. The neater solution is to then search and replace mailFrom with MailTo

Save the document and then use the text “ca newer:2017/12/31 older:2018/09/01” (without quotes) in B2in the sheets document. Obviously adjust the dates as appropriate.Sheets label to search for emails in 2018

Note that I found that if my date selection was too large the script would time out. Depending on how many emails you have in gmail, I would probably filter out a year at a time. The filter syntax you enter into the B2 field is the syntax you would use to search in gmail.

Once you have your filter, selectHK Scripts/Extract email addresses.

Hopefully all goes well and you now have a list of emails that were sent to your catch all address in a new tab.

The neat thing is that you can run the script multiple times and each search result will generate a new tab. This way you can run this periodically to capture mail received each month. The caveat is that you do need to keep emails with the ca label in your gmail for at least a month!

The screenshot below shows a few results from this search.

Note that I do have a couple of oddities in this result (which is why I included them). There are a couple of email address’s that go to my catchall address but the emails were not forwarded to my original domain. My gravatar email address is actually another gmail address forwarded to a catch all address. As the original TO field is not my domain it doesn’t look quite right. Some other oddities have included google groups targets or some other nefarious/badly formed bcc emails. These should be treated as an exception and handled manually (outside the scope of this document.
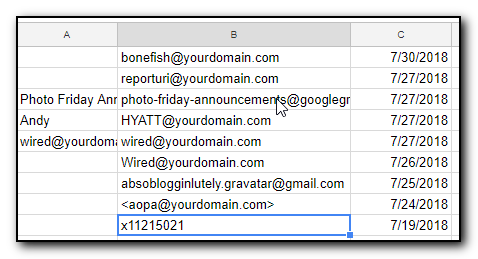
 

L:ist of catch all email addresses used

Grab the contents of column B and save to a new tab – this new tab will be used to split the email addresses into a format suitable to paste into Dreamhosts mail control panel.

I then did the following to parse the email address into a useable format. Note that this may not be the most efficient but it gives me the ability to easily verify each stage rather than debug a complicated excel formula.

The screenshot below shows what it should look like when completed. (The two shaded rows are the odd ones that I deal with manually)Spreadsheet of email addresses ready to paste into Dreamhost

Column A should be your original To field. The other cells are filled out as follows. Note you need the starting = sign to signify a calculated field.

D   =split(A1,“@”)

E – not used.

=” yourgooglealias+” & D1 & “@gmail.com”

Note there is a space at the start of G as this is used as the separator in the next step.  Yourgooglealias is the bit before the @ sign in your gmail address

=(substitute(substitute(A1& G1,“<“,“”),“>”,“”))

This replaces any chevrons that may be around the email address and then takes the original email address, adds a space and then adds the new gmail address where the alias now becomes +alias.


Finally, copy the contents of column K into dreamhosts control panel. https://panel.dreamhost.com/index.cgi?tree=mail.addresses&current_step=Index&next_step=Bulk should hopefully work but make sure you are pointing to the right domain!

Select Mail, your mail domain, Forwarding Only/Edit All.
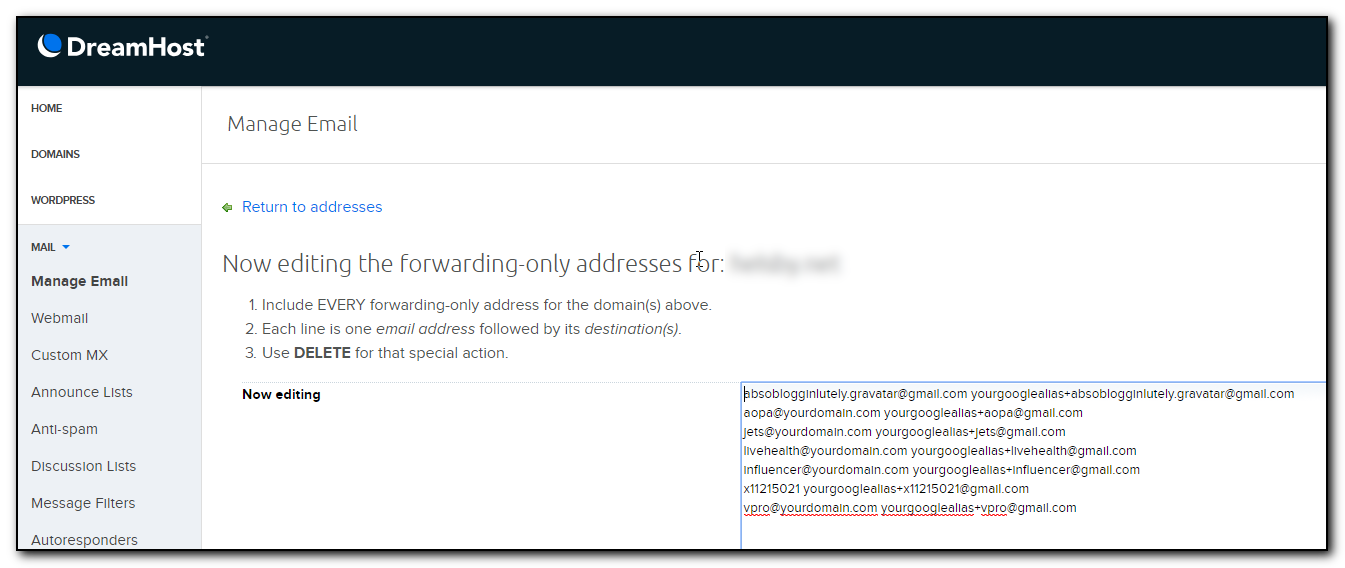
Pasting emails into Dreamhost

Hit the save button and you are done.

Your email should be quickly delivered to gmail and still easily filtered out based on the to field.

The downside is that there are still some webforms out there that do not recognise the + character as valid in the email address. Spammers can also easily work out what your main email address is and send directly to that mailbox.


Please let me know if you have any questions or comments


Fixed – Office365 journalling does not work for one user

I’ve been working on a case with Microsoft’s Office365 support for several weeks trying to find out why email sent *to* a particular user was not being journalled. All the other mail seemed to be journalled to the external recipient, email from the user was working, just not email to that user.

The experience was quite frustrating as Microsoft’s support were terrible at calling back and could not grasp the concept of email tracking. Their solution after making a change was to wait a day to see if it was fixed although it was quite apparent that the Microsoft servers were not even trying to send the email (by looking at the Trace Logs you can see what email was being sent and received).

After checking the connectors were setup, mail properly scoped, the user had no rules on their mailbox, Microsoft’s solution was to delete the mailbox and reset it up again.  Not so easy when the mailbox/user is federated with Active Directory and the user happens to be the owner of the company. That was not a conversation I was going to have with them!

The only thing that was different with this user was that in troubleshooting this issue we had set the user up to receive the journalling non delivery reports. I figured that if the emails were not being delivered, maybe sending him the errors would help. However no reports were being received either.  However, according to KB 2829319 this behaviour can be seen. Although I had removed the journal receipient in the web gui, the emails were still not being journalled until I added another external email address to the configuration using the powershell command set-transportconfig -JournalingReportNdrTo [email protected]

At this point, all the email started to be journalled.

Note that we only added the recipient into the mix when I was trying to work on the initial problem so it looks like this wasn’t the only fix.

The other thing we did was change the outboundconnector to be onpremises. Changing the setting in the GUI we then ran Set-OutboundConnector archivemymailconnector -routeAllmessagesviaonpremises $true.


These two combinations seemed to fix the issue.

One thing I also learnt was that it is really useful to send multiple emails between changes and keep the subject line starting the same. Use the date/time at the end of the email. That way you can sort the email logs by Subject and just pick out the ones you were working on. By having the subject start with zzz followed by Round X (ie zzz Round 1 – change connector – 1345pm and zzz Round 1 – change connector 1346pm ) then the results are likely to appear at the end of your mail logs if you sort by subject.  Sorting by Date was not always a good idea as mail flow could occur between mail coming into the server and mail leaving the server.


Spammotel going paid.

Years ago I came across Spammotel.com – a useful service that would generate random looking email address’s and then allow you to receive emails sent to those email address’s at your real address. A useful third party system that would allow you to quickly and easily change the destination of where the emails go and also block people who abused the address by deleting the address. In the past I had several email lists that go to my Spammotel and then are redirected to my work email address – when I changed jobs, I only had one location to change my email address and all the emails started coming into the new mail account. (This was before RSS feeds to allow you to go grab the content when convenient as opposed to having it delivered via email).
They have now decided to go pro only and charge $9.99 a year for the service – still not bad, but to be honest, it’s probably better to get a domain of your own and set up catch all email address’s and then dev/null any that get abused. That might sound a bit complicated for some users, but most people reading this blog will know what I’m on about.
Ironically, the email announcement about this change in service when to my Gmail spam folder and my corporate Postini filter.
I’ll be checking the web site to see which of my to see what email lists are active and see if I need to resubscribe to any (the list gives you the number of emails received which is a nice function).

Blat crashes when an email is sent – fixed.

I had an issue with blat yesterday with a new script I was working on. Every time I sent an email, it would crash and I would get “A Win32 command line eMail tool has stopped working.” As this was also running on a Windows2008 server this was also affecting the reliability index on the server – one of the things we check as part of our checkups.
I spent a good while trying to work out what was wrong, typed out the command to send mail and it worked – so I knew the issue was not blat itself. After calling over a colleague to help, demonstrating the (reproducible) problem of pasting the script line and crashing blat I asked what was wrong. The two of us still took a couple of minutes before he realised I had mistyped the server name used to send the mail. Instead of domain.com.s6a1.psmtp.com I had entered domain.com.s6a1.pmstp.com
Sure enough – if the mail server hostname can not be resolved by blat – it will crash. I was also able to reproduce this on my Windows7 machine at home too.

A simple fix but difficult to find after looking at code for a long time – getting someone else to look at your code often does wonders.

BPOS active Directory Synchronization does not work on 64bit or domain controllers.

Thinking about BPOS to host the exchange mail for your small office? – I discovered a small gotcha this afternoon but first a couple of thoughts in our recent experiences between Google Apps and Microsoft BPOS.

We’ve had several requests from clients to host their email in the cloud using services like google apps or Microsoft Hosted Exchange. Our first deployments were with google apps due to the lower cost per year, but as we’ve found out the support from Google is severely lacking.  We had a peculiar issue where one users email sent through outlook would get marked as spam all the time, yet if they used the gmail web interface and sent exactly the same content the mail would get sent with no problems.  The service that marks the destination mail as spam is postini – now owned by Google so it should really be a simple matter of turning over the problem to Google to investigate. Unfortunately Google’s response so our request was basically “thanks – if we feel like getting back to you, we might do – in a couple of days”.   As it turned out, the issue was resolved by deleting the google sync profile and recreating it again.

Contrast this to a Microsoft issue which started off as a pre-sales technical call to get a user id setup and ended up with the gtlv owa issue I blogged about earlier. I had several calls from Microsoft within an hour to work on the issue. They worked really hard to ensure my problems were solved and it almost felt like they were harassing me as they kept following up for a status even though I’d told them a couple of times that I was happy for the case to be closed – I even got a call at 5pm on Saturday afternoon from support – something I’ve not experienced (at least from a end user experience!)

So, after singing Microsoft’s praises – the gotcha.  Microsoft’s Hosted Exchange service has a directory sync service that synchronises AD information to the cloud ready for newly created users and distribution lists to appear in the hosted exchange environment. Unfortunately, according to the Directory Synchronization prerequisites the server needs to be running 32bit AND not be a domain controller.   Unfortunately for small companies just starting out from a peer to peer network and getting their first server (but don’t want SBS2008 for some reason), this first server is very likely to be 64bit (crazy not to nowadays) and also a domain controller – possibly/probably even THE domain controller. Installing a 32bit member server is totally out of the question.   It’s not *that* big a deal as all the information can be created online, but it’s twice the amount of data entry along with the possibility of typos but also every AD change of membership and user creation/deletion now needs to be duplicated online.  For large organizations this is not going to be a problem as they’ll likely have extra servers lying around, but for small businesses this is very unlikely. For very large organizations (ie Universities hosting mail through live.edu) it seems that the AD sync program actually requires extra software functionality with the Identity Lifecycle Manager (ILM) package (however I’m not too familiar with these details just yet)

This is the second flaw in Microsoft’s online feature list that extols the virtues of Microsoft vs Google that I’ve found – Active Directory synchronization is not always possible and the other is the benefit of not having to download an application to synchronize data from outlook to the cloud/google – fair enough a client doesn’t have to be downloaded for that application but instead a single signon client needs to be downloaded to prevent the various Microsoft apps asking for the password multiple times. I did think that was the whole point of the “save password” option is for in the outlook and browser applications!

I was also really surprised that the Exchange online is not running Exchange2010 – the Outlook Web App is so much nicer in 2010 compared to 2007 – as I run Outlook 2010 at home and Exchange2010 in the office I’m spoilt (but I still need Office 2010 on the work laptop – thats hopefully coming real soon)

View headers or Source in Outlook 2010

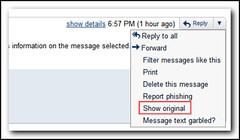
As part of my investigation into the gmail hacks, I needed to check the source of the email I had received to see how the email had been sent to me. It could have been spoofed or sent via gmail and the headers would allow me to see which was the case. The email received in my gmail account was easy to see – I just had to click the down arrow next to the reply button and choose Show Original and then view the headers.
View the message source of a mail received in gmail (by absoblogginlutely)
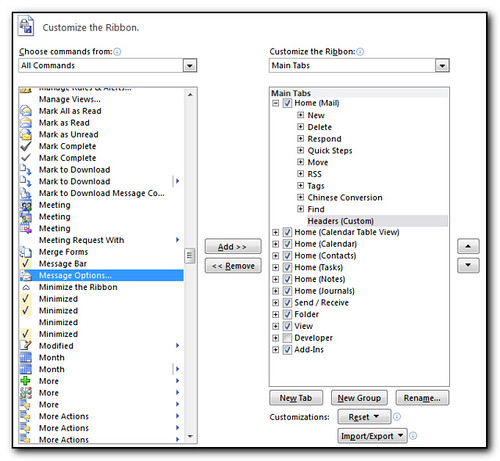
Outlook is a bit complicated. The easiest way is to bring back the view source icon to the ribbon. First you need to right click on in the ribbon and choose Customize the Ribbon. In order to add a new button to the ribbon, a new group needs to be created. It is probably best to expand the Home (Mail) Tab, select the last option which was “Find” in my case and then click the New Group button. Rename the Group and ensure it is selected. Then select “All Commands” under “Choose commands from:”, scroll down and select “Message Options…” and then click Add.
Adding Message Source to the ribbon in Outlook 2010 (by absoblogginlutely)
Click Ok back to outlook and you will now be able to select an email, click on the new button in the menu and view the headers.

Fixing exchange2003 unable to send to exchange2007 mailboxes.

In my newly installed exchange2007 site I also had an exchange2003 server that handles all the incoming/outgoing mail apart from the test user that I had moved to the 2007 server. Unfortunately I could not send mail to the 2007 user but I could receive mail from this user. T here was a lot of postings on the internet and various forums for solutions for a similar problem but normally in the opposite direction.
After a post at petri (2nd posting down) I deleted my smarthost setting on the virtual server on the 2003 machine and mail started flowing. Now I can progress in my mail migration. Many thanks to Andy at Petri for the answer on this one.
Annoyingly this did come up in the best practise analyzer, but only as a warning. As the smarthost had been working I left it alone – I really should have known better.

Removing pesky paragraph marks

I’m sure you’ve all had the annoying experience when you are typing in a Word document or an outlook email and all of a sudden the screen is filled with backwards P’s – the paragraph marks. I’ve never been able to work out what triggers this to occur until today when I decided to find out after yet another helpdesk ticket came in asking how to turn this function off. (It is especially tricky in outlook as the button does not appear in the standard toolbars within outlook.)
I found that pressing ctrl, shift and 8 (or more correctly ctrl *) will toggle the paragraph mark status. I suspect that the keyboards are registering the ctrl key being held down at the same time as the shift 8 key is being pressed to get a * displayed in the text.
Note that you can find out what other shortcut keys take affect by right clicking an empty part of the toolbar, clicking customize, selecting the Options tab and then enabling “Show shortcut keys in Screen Tips” and then clicking ok to close the dialog boxes. Turning this on helped me determine the buttons to press.