Tag Archives: Powershell

Fixed: Installing SQL Server Reporting Services (SSRS) prompts for key

Had an odd experience attempting to install SSRS on a 2019 SQL instance the other day where the software kept asking for the install key to install. Unfortunately I did not take a screenshot but after starting the install progress it asks for a key and refuses to take the key provided.

Other search results state to just enter the key that is obtained by either trying to reinstall SQL and grabbing the key that is displayed during the setup process or by grabbing the key from the extracted 2019\x64\defaultsetup.ini file in the SQL source folder (not the SSRS Install folder).

This didn’t help as the key was reported as being incorrect.

Using dbatools I figured I would try installing from the commandline to see if I would get any better troubleshooting logs. Attempting to install SSRS with the fantastic dbatools module with a -whatif parameter gave me a warning that the server was pending a reboot.

install-dbainstance -Feature reportingservices -path e:\sql2019\source\ -version 2019 -instancename localhost -whatif

Rebooted the server and the key was then taken on the subsequent installation attempt.

Not sure why the install just keeps asking for the key rather than displaying “You need to reboot”

Using Microsoft Graph Update-MgGroup with Certificate Based Authentication as a working alternative for Set-UnifiedGroup

Yesterday I had a fun time converting a PowerShell script that used the set-unifiedgroup powershell command that was originally running with basic authentication, to a script that would run using certificate based authentication so it can run against a tenant that uses Modern Authentication for office365.

There were quite a few hurdles to overcome so hopefully this helps other people.

Step 1 – Fix Office365 logins

Blank browser page that loads when attempting to log into Office365

The computer was initially generating a blank white page on the screen when attempting to log into the Office365 or Azure portal. This was resolved by resetting the browser settings in Control Panel / Internet Options. Clearing cookies and temporary internet files did not help for this step.

Step2 – Connect to Office365.

The ExchangeOnline module was already installed on the computer, but needed to be updated with

 update-Module -Name ExchangeOnlineManagement

The rest of this phase reduced the previous 5+ lines of code to log into Office365 to a one liner. There are quite a few steps involved in this, but App-only authentication in Exchange Online PowerShell and Security & Compliance PowerShell | Microsoft Learn is a good document to follow. Make sure that the SSL certificate is documented somewhere so that you get a reminder *before* the certificate expires. Once the certificate is uploaded to Azure and permissions are set it is possible to connect with

connect-exchangeonline -CertificateThumbprint "1a2b3c4d5e6f....." -appid "123abc-456def...." -organization "companyname.onmicrosoft.com"

Initially I thought that would be it, but after running the script I discovered the next big snag –

Step3 – Converting set-unifiedgroup to MS Graph module equivalent

The script gathered a list of Microsoft 365 distribution groups (or UnifiedGroups) in Office365 that had their access level not set to private and changed them to be private. The previous code was this

Get-UnifiedGroup -ResultSize Unlimited | Where-Object { $_.primarySmtpAddress -match 'companyname.onmicrosoft.com' -and $_.accesstype -ne 'Private' -and $_.HiddenFromAddressListsEnabled -ne 'true' } | Set-UnifiedGroup -AccessType Private -HiddenFromAddressListsEnabled $true -verbose

However, set-unifiedgroup is one of a few commands that cannot be used with Certificate Based Authentication and the msgraph module has to be used instead. The Microsoft documentation points this out but does not provide helpful information on how to actually get this accomplished. The linked information refers to api calls rather than using actual Microsoft Graph PowerShell commands and there were several gotchas in this process (hence this blog post).

First the Microsoft graph module needs to be installed on the computer with

Install-Module Microsoft.Graph

Step3a – Importing Microsoft.Graph.Groups

When importing the Microsoft.Graph module on the machine into PowerShell , not only did it take over 10 minutes to import, an error message is generated stating

Import-Module : Function Get-MgUserContactFolderChildFolderContactMultiValueExtendedProperty cannot be created because<br>function capacity 4096 has been exceeded for this scope.
Screenshot error stating Import-Module : Function Get-MgUserContactFolderChildFolderContactMultiValueExtendedProperty cannot be created because
function capacity 4096 has been exceeded for this scope.

This is due to the sheer number of commands available in the module and PowerShell 5.1 has a limit to the number of commands that can be used. Using PowerShell 7 is one way of fixing that issue but I was trying to reduce the amount of changes being made to this pc. By importing a subsection of the module with import-module microsoft.graph.groups the number of commands that are available is greatly reduced and the import is also a lot quicker. 10 seconds to run instead of over 10 minutes from above.

Step3b – Filter left

The original search returned all groups in Office365 and then filtered them locally. In this large organization, there are a significant number of groups returned and the lookup took several minutes to run. By passing a filter parameter I was able to reduce the number of groups significantly.

Unfortunately the filter parameter does not support accesstype or the primarysmtpaddress so these have to be filtered out by piping the groups to a select-object statement.

Get-UnifiedGroup -ResultSize Unlimited | Where-Object { $_.primarySmtpAddress -match 'companyname.onmicrosoft.com' -and $_.accesstype -ne 'Private' -and $_.HiddenFromAddressListsEnabled -ne 'true' }

becomes

$groups=get-unifiedgroup -filter {(hiddenfromaddresslistsenabled -ne $true)} | where-object {$_.primarysmtpaddress -match 'companyname.onmicrosoft.com' -and $_.accesstype -ne 'Private'} 

After making this change, the groups were returned in less than a minute.

Step3c – Changing from set-unifiedgroup to Update-MgGroup

The new command to modify the group is update-mggroup but the standard command does not have the ability to change the access type as per the documentation at Update-MgGroup (Microsoft.Graph.Groups) | Microsoft Learn

Screenshot for the update-MgGroup command that is missing the AccessType parameter

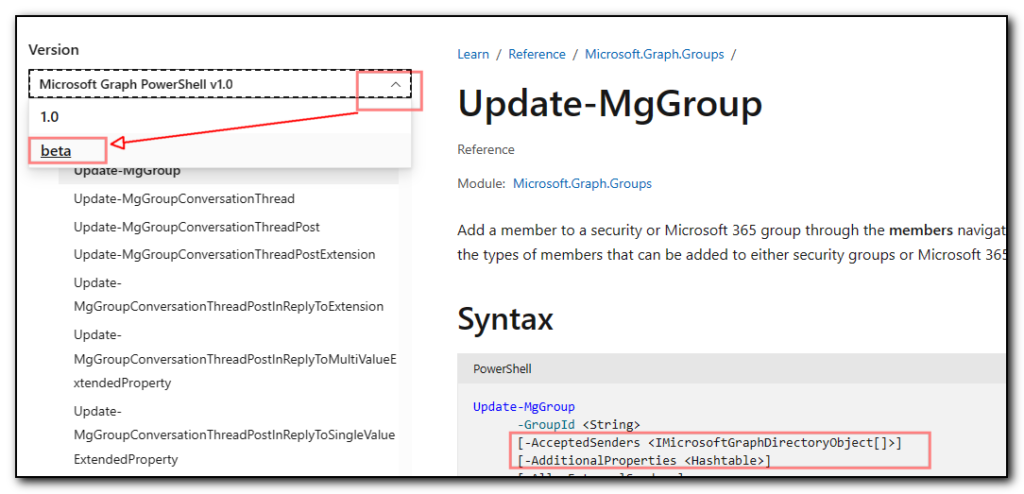
However, after switching the document to the Beta version of the api in the dropdown menu on the left, the accesstype parameter becomes available. The above screenshot shows AccessType is missing vs the screenshot below that includes this option.

Screenshot of the update-MgGroup beta command that includes the AccessType parameter

We therefore end up with the following commands to set the profile to Beta, load the Microsft.Graph.Groups subset of the module and then connect to Microsoft. Graph

Select-MgProfile -Name "beta"
import-module microsoft.graph.groups
connect-mggraph -clientid "1a2b3c4d5e-1234-1a2c3-a1aa-aa12b3456c7d" -tenantid companyname.onmicrosoft.com -certificatethumbprint "0a4f....fe"

I had issues with the next bit of code and ended up using my Exchange online connections to retrieve the groups that matched the criteria of not being hidden from the address list and where the access type was not private, and then using the ExternalDirectoryObjectID from those groups in the update-mggroup command from the graph module.

In theory I should have been able to search using the get-mggroup command but I was having issues getting the filters and search to work correctly. I could not get any results to come back for searches that included the companyname.onmicrosoft.com email address. As soon as I added that to the criteria the results came back empty. Due to time constraints I used the (admittedly) messy option of using Exchange to grab the groups and graph to update them.

$groups=get-unifiedgroup -filter {(hiddenfromaddresslistsenabled -ne $true)} | where-object {$_.primarysmtpaddress -match ‘companyname.onmicrosoft.com’ -and $_.accesstype -ne ‘Private’}

foreach ($group in $groups) {
update-mggroup -groupid $group.ExternalDirectoryObjectId -accesstype "Private" -HideFromAddressLists
}

Finally, the script was completed by disconnecting the Graph and the Exchange connections

get-pssession | Remove-PSSession
Disconnect-MgGraph
Stop-Transcript

Using the transcript option at the beginning of the script really helped in debugging this code as it’s meant to run from a scheduled task and viewing the transcript enabled me to see what the issue was and then decide to test further in an interactive session.

SQL, dbatools and Webroot

I have been busy working on a SQL server migration, and have come across a couple of issues.

Firstly, attempting to install or upgrade an SQL instance with Webroot on the machine generates an unauthorized action on the machine. Reviewing the error logs provides the following error

Exception type: Microsoft.SqlServer.Configuration.Sco.ScoException
Message: 
Attempted to perform an unauthorized operation.
HResult : 0x84bb0001
FacilityCode : 1211 (4bb)
ErrorCode : 1 (0001)
Data: 
WatsonData = Uninstall@{145996FC-8E6B-47AB-BEA5-A84F12B72AF5}

Navigating to HKEY_LOCAL_MACHINE\SOFTWARE\Microsoft\Windows\CurrentVersion\Uninstall registry shows the value {14599…..} is Webroot. Set server into unmanaged mode and then removing Webroot then enabled me to install SQL service packs.

I’ve also run into the same issue on new installs which leads me to the second issue.

I’m using dbatools to install with notes taken from the newly printed dbatools in a month of lunches. A book I purchased pre-pandemic and promptly forgot about but I finally got my hands on the book.

dbatools is a fantastic resource for SQL admins who want to automate everything and a common task is installing SQL.

Unfortunately there’s a typo in Listing 13.6 and 13.7 The parameter SQLUSERDBDATADIR that is coded into the sql config.ini file should actually be SQLUSERDBDIR

It took me a while to figure that one out. I then went to check out the books online only to find someone had found and reported the same error – yesterday!

The moral of the story is to check the books online first.

Also, whilst looking at my Manning books – I have a Powershell problem (or maybe with all these books I don’t!

Listing of Powershell books from Manning Publications

Fixed: The trust relationship between this workstation and the primary domain failed

Login dialog box showing The trust relatiionship between this workstation and the primary domain failed.

Yes, this old chestnut! Had this issue today on a server, but for some reason the standard netdom resetpwd command would not work.

Running the command netdom resetpwd /s:servername /ud:domain\user /pd:* would give me the error message “The machine account password for the local machine could not be reset”

Powershell to the rescue and the equivalent commands running on the affected machine fixed the issue

$c=get-credential

test-computersecurechannel -repair -credential $c

shutdown /f /r /t 3

Unfortunately I’ve had to this multiple times in the past and it’s about time I blogged the solution for my own reference in the future

Powershell oneliner to check network connections used on current machine based on Mike Robin’s blog post

Mike Robins had a nice tip yesterday about using powershell to see what your system is talking to and I thought I would tweak it slightly to potentially make it even more useful.

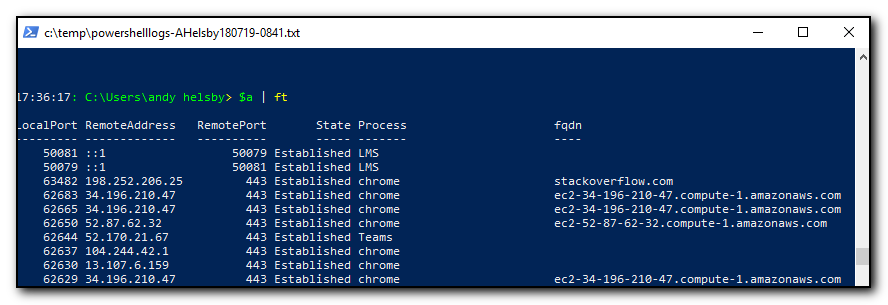
When I ran the command on my machine it took a while to run and I also thought it would be nice to tweak it so that the machine does a reverse dns lookup to retrieve the host names that the system is talking to. This might provide an indication of whether the connection is good or not.

I saved the output of the command to a variable so if I need to tweak the display output I can do so easily without running the script again.

$a=Get-NetTCPConnection -State Established | `
Select-Object -Property LocalPort, RemoteAddress, RemotePort, State,`
@{name='Process';expression={(Get-Process -Id $_.OwningProcess).Name}}, `
@{name='fqdn';expression={([System.Net.Dns]::GetHostByAddress($_.Remoteaddress).Hostname)}},`
 CreationTime
$a

This is a very quick and dirty hack and takes ages to run on my computer. It probably doesn’t help that I have a ton of chrome tabs open which will require a lot of dns lookups and several of them are the same host but this method will lookup them all up individually. IP  and dns lookup on active network connections


Yes, I split this ‘one-liner’ into multiple lines to make it easier to read on the screen but if you have to do that, then it’s not really a one-liner and even more so if you are unlikely to remember it.

Office365 Exchange Control Panel now has command logging for admins.

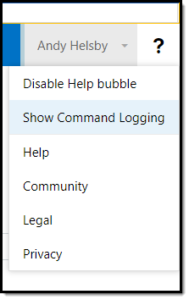
Help Button, Show command logging.One of my annoyances with Office365 administration tasks was that I could make changes to the interface but had no idea what commands were being run behind the scenes. This made creating scripts a frustrating trial and error attempt at finding the correct verbs to run.
However, this morning I stumbled under the Help/Show Command Logging option in the admin panel. This is similar to the Show command output that was available in the Exchange 2010 admin console that I used extensively in the good old on-premise days.

I have no idea how long this has been here but it really made my day.

Now if only the rest of the Office365 admin panels had the same functionality.

Retrieve Mailbox Migration errors for Office365

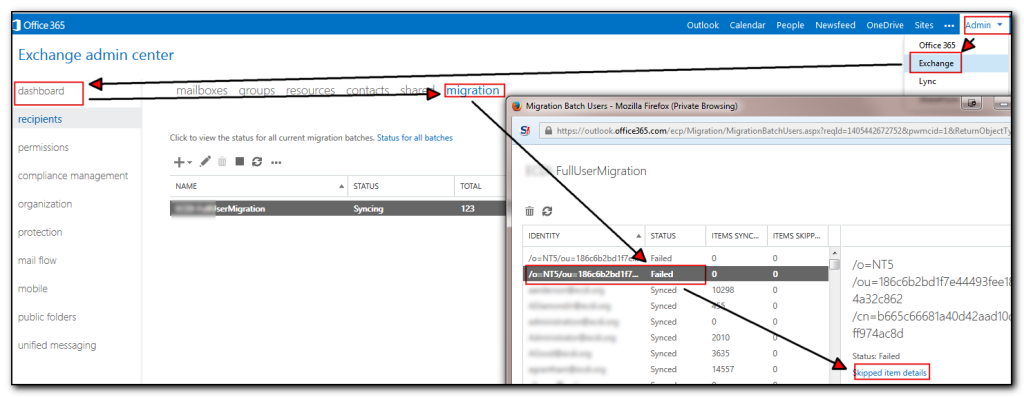
When you have a lot of mailboxes to migrate, Microsoft’s provided method of viewing the errors involves a tedious amount of clicking by logging into the portal, selecting Exchange, Migration, View details, scroll down to find a failure, select the user, click view details.

Viewing Migration status in Office365


Rather than use the tedious method of going into the details, selecting a user and then viewing details, run the following powershell script (once connected using the previous office365 connection script)

get-migrationuser -status failed  | get-migrationuserstatistics | select identity,emailaddress,recipienttype, error,bytestransferred |export-csv c:\temp\migrationstatus.csv

I also have a simple loop that gets me the status once an hour. Obviously change the email address’s appropriately.

while (1)
{
$a=(get-migrationuser | out-string)
send-mailmessage -to [email protected] -subject “Company Migration Stats” -from [email protected] -smtpserver my.mailserver.com  -body $a
start-sleep -seconds 3600
}

Pimp your Powershell Prompt

I use powershell a lot at work – I’m not a guru by any means and I often find it hard to remember the commands I have run in a session, either for future use or for documenting in my time sheet (which also acts as a point of reference for future helpdesk tickets).

When I started going through the Powershell in a month of lunches book (which I highly recommend or the Powershell v3 book) I decided to use the start-transcript commandlet to record all my powershell activities.  This worked very well until I would scroll through several screens worth and then forget what file I had saved my transcript too.  There was also the possibility of forgetting to transcript everything.

By using the powershell profile file I was able to enter the commands to automatically set the transcript to the current date. I was then able to modify the title of the powershell prompt to display the filename so I could always see where the file was saved with the added bonus of a variable being used if I ever needed to open the transcript

My next step was to include the time in the powershell prompt – this enables me to go back through the transcript and see how long it took to run the commands for my timesheet entries.  Remembering back to the good old dos days, I remembered the prompt command. A quick bit of experimenting with the Date command I had the current time displayed at the beginning on the Powershell prompt. Note this is displayed after the previous command is run, so technically it’s not the exact current time, but the time that the prompt was displayed on the screen.

The final profile script can be copy/pasted into notepad by typing in

notepad $profile

is as follows:-

cd \andy\powershellinamonthoflunches

$log="c:\temp\powershelllogs-" + $env.username + (get-date -uformat "%y%m%d-%H%M") + ".txt"
start-transcript $log
$host.ui.rawui.WindowTitle = $log

function prompt
{
write-host ((Date -uformat %T).ToString() + "PS " +$(get-location) + ">") -nonewline
return " "
}

This ends up with a powershell prompt that looks like the following. Hope this brief posting inspires you to change your powershell prompt to be even more useful for you.


Powershell prompt with the filename in the title and current time in the prompt


Fixed – Office365 journalling does not work for one user

I’ve been working on a case with Microsoft’s Office365 support for several weeks trying to find out why email sent *to* a particular user was not being journalled. All the other mail seemed to be journalled to the external recipient, email from the user was working, just not email to that user.

The experience was quite frustrating as Microsoft’s support were terrible at calling back and could not grasp the concept of email tracking. Their solution after making a change was to wait a day to see if it was fixed although it was quite apparent that the Microsoft servers were not even trying to send the email (by looking at the Trace Logs you can see what email was being sent and received).

After checking the connectors were setup, mail properly scoped, the user had no rules on their mailbox, Microsoft’s solution was to delete the mailbox and reset it up again.  Not so easy when the mailbox/user is federated with Active Directory and the user happens to be the owner of the company. That was not a conversation I was going to have with them!

The only thing that was different with this user was that in troubleshooting this issue we had set the user up to receive the journalling non delivery reports. I figured that if the emails were not being delivered, maybe sending him the errors would help. However no reports were being received either.  However, according to KB 2829319 this behaviour can be seen. Although I had removed the journal receipient in the web gui, the emails were still not being journalled until I added another external email address to the configuration using the powershell command set-transportconfig -JournalingReportNdrTo [email protected]

At this point, all the email started to be journalled.

Note that we only added the recipient into the mix when I was trying to work on the initial problem so it looks like this wasn’t the only fix.

The other thing we did was change the outboundconnector to be onpremises. Changing the setting in the GUI we then ran Set-OutboundConnector archivemymailconnector -routeAllmessagesviaonpremises $true.


These two combinations seemed to fix the issue.

One thing I also learnt was that it is really useful to send multiple emails between changes and keep the subject line starting the same. Use the date/time at the end of the email. That way you can sort the email logs by Subject and just pick out the ones you were working on. By having the subject start with zzz followed by Round X (ie zzz Round 1 – change connector – 1345pm and zzz Round 1 – change connector 1346pm ) then the results are likely to appear at the end of your mail logs if you sort by subject.  Sorting by Date was not always a good idea as mail flow could occur between mail coming into the server and mail leaving the server.