Tag Archives: 4work

Streamdeck is now finally working with Teams

Screenshot of Elgato's Streamdeck buttons showing microphone, blur plugins and camera view

TLDR – set the api key whilst having a meeting with yourself

I was fortunate to get a Streamdeck for a birthday present back in March this year – the announcement that it was integrated into Teams was the final push to get one. I had been debating whether to get one or not and had been using TouchPortal as a software solution running on an old Kindle as test bed for quite some time to see how much I would use this functionality. The answer is a lot!

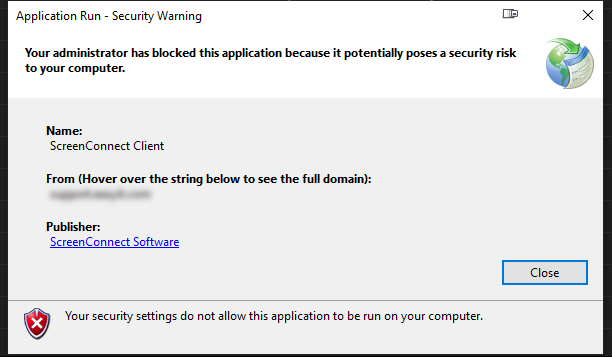
(Very) Shortly after getting the device and setting it up, the Teams plugin was pulled from the store but eventually re-released and it has never worked since. If I was lucky it would intermittently work for 5 minutes or even 20 if there was a blue moon, I was wearing my lucky jumper and there was a z in the day’s name.

Other people have also had the same problem and there has been a long thread on the elgato subreddit about the issue with various solutions provided but none of them have worked for me, at least on a consistent basis.

However a post yesterday on the Microsoft community forums had someone getting the plugin working with the new Teams version. I followed the steps and the issue was still not working for me – however it did give me a clue.

This morning I confirmed that the WebSocket was listening on port 8124 with netstat -aon | find “8124” and was fiddling around trying to get the plugin to work. I had already confirmed the api key (found from Settings/Privacy in Teams and pasted it into the plugin settings and was still getting the lock icons, but this morning I selected the calendar, “Meet now” option and started a meeting with myself. (It was very early and there was no one else to call!)

After the meeting was established, I opened the plugin and re-entered the api key in the button settings and this time the setting worked, all of my buttons had the padlock overlay removed.

Fearing the worst, I killed the meeting, restarted Teams and Stream Deck, and all the buttons are still working. Being the optimist, I then rebooted the computer, restarted Teams and Stream Deck and the buttons still work. 2 hours later and the buttons are *still* working.

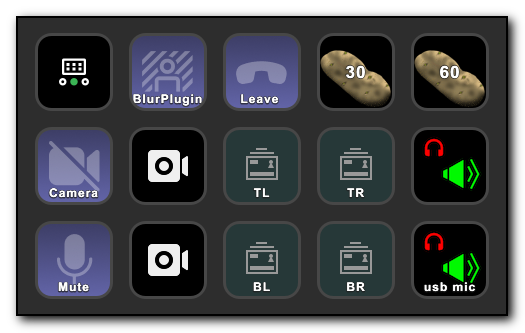
For those interested, the TL, TR, BL, BR refer to the monitors attached to the desktop computer and enable me to quickly switch the OBS camera to the relevant monitor. Using the classic Teams app allows me to share a video feed from a camera so all I have to do is share the one video stream and let OBS and Streamdeck take care of everything else. Unfortunately, the New Teams does not have this functionality and the OBS output screen needs to be shared which requires way more key presses to setup and the OBS output running on one of the monitors, so until this shows up in the New Teams application, it’s Teams Classic for me.

Solved: “No row was found with id” when selecting row from Excel with Power Automate

I’ve been trying to automate the manipulation of incoming emails from an unnamed source that contains the users first and last name but not their email address and then send an email to that person.

Unfortunately, I am not able to compose an email address based on the first letter of their first name and full surname along with the domains as the domains could be different (and the naming convention too).

I was initially doing this with a case statement in Power Automate which is very ugly, inefficient and pretty laborious to set up and I also found out the hard way that there is a limit to the number of Case statements you can have – 25 in case (pun intended) you are wondering.

Don’t do this – it’s ugly, inefficient and hard to manage.

Spent some time today to switch to an excel lookup that will grab the first and last name from the email and then pull back the email address that should be used in Excel. However, it kept returning the error no row was found with id ‘First Last’ even though there was only one row with the value of ‘First Last’

The issue was that I had created a table in Excel for all of Column C through E and this includes lots of empty lines that the Get a row command will choke on. Fixed by defining the table in Excel to only contain the actual data that I needed such as $C$1:$E$80, Power Automate now only returns one value and the script continues on successfully.

Power Automate flow to read email, set some variables and send an email out

Fixed: Installing SQL Server Reporting Services (SSRS) prompts for key

Had an odd experience attempting to install SSRS on a 2019 SQL instance the other day where the software kept asking for the install key to install. Unfortunately I did not take a screenshot but after starting the install progress it asks for a key and refuses to take the key provided.

Other search results state to just enter the key that is obtained by either trying to reinstall SQL and grabbing the key that is displayed during the setup process or by grabbing the key from the extracted 2019\x64\defaultsetup.ini file in the SQL source folder (not the SSRS Install folder).

This didn’t help as the key was reported as being incorrect.

Using dbatools I figured I would try installing from the commandline to see if I would get any better troubleshooting logs. Attempting to install SSRS with the fantastic dbatools module with a -whatif parameter gave me a warning that the server was pending a reboot.

install-dbainstance -Feature reportingservices -path e:\sql2019\source\ -version 2019 -instancename localhost -whatif

Rebooted the server and the key was then taken on the subsequent installation attempt.

Not sure why the install just keeps asking for the key rather than displaying “You need to reboot”

Using Microsoft Graph Update-MgGroup with Certificate Based Authentication as a working alternative for Set-UnifiedGroup

Yesterday I had a fun time converting a PowerShell script that used the set-unifiedgroup powershell command that was originally running with basic authentication, to a script that would run using certificate based authentication so it can run against a tenant that uses Modern Authentication for office365.

There were quite a few hurdles to overcome so hopefully this helps other people.

Step 1 – Fix Office365 logins

Blank browser page that loads when attempting to log into Office365

The computer was initially generating a blank white page on the screen when attempting to log into the Office365 or Azure portal. This was resolved by resetting the browser settings in Control Panel / Internet Options. Clearing cookies and temporary internet files did not help for this step.

Step2 – Connect to Office365.

The ExchangeOnline module was already installed on the computer, but needed to be updated with

 update-Module -Name ExchangeOnlineManagement

The rest of this phase reduced the previous 5+ lines of code to log into Office365 to a one liner. There are quite a few steps involved in this, but App-only authentication in Exchange Online PowerShell and Security & Compliance PowerShell | Microsoft Learn is a good document to follow. Make sure that the SSL certificate is documented somewhere so that you get a reminder *before* the certificate expires. Once the certificate is uploaded to Azure and permissions are set it is possible to connect with

connect-exchangeonline -CertificateThumbprint "1a2b3c4d5e6f....." -appid "123abc-456def...." -organization "companyname.onmicrosoft.com"

Initially I thought that would be it, but after running the script I discovered the next big snag –

Step3 – Converting set-unifiedgroup to MS Graph module equivalent

The script gathered a list of Microsoft 365 distribution groups (or UnifiedGroups) in Office365 that had their access level not set to private and changed them to be private. The previous code was this

Get-UnifiedGroup -ResultSize Unlimited | Where-Object { $_.primarySmtpAddress -match 'companyname.onmicrosoft.com' -and $_.accesstype -ne 'Private' -and $_.HiddenFromAddressListsEnabled -ne 'true' } | Set-UnifiedGroup -AccessType Private -HiddenFromAddressListsEnabled $true -verbose

However, set-unifiedgroup is one of a few commands that cannot be used with Certificate Based Authentication and the msgraph module has to be used instead. The Microsoft documentation points this out but does not provide helpful information on how to actually get this accomplished. The linked information refers to api calls rather than using actual Microsoft Graph PowerShell commands and there were several gotchas in this process (hence this blog post).

First the Microsoft graph module needs to be installed on the computer with

Install-Module Microsoft.Graph

Step3a – Importing Microsoft.Graph.Groups

When importing the Microsoft.Graph module on the machine into PowerShell , not only did it take over 10 minutes to import, an error message is generated stating

Import-Module : Function Get-MgUserContactFolderChildFolderContactMultiValueExtendedProperty cannot be created because<br>function capacity 4096 has been exceeded for this scope.
Screenshot error stating Import-Module : Function Get-MgUserContactFolderChildFolderContactMultiValueExtendedProperty cannot be created because
function capacity 4096 has been exceeded for this scope.

This is due to the sheer number of commands available in the module and PowerShell 5.1 has a limit to the number of commands that can be used. Using PowerShell 7 is one way of fixing that issue but I was trying to reduce the amount of changes being made to this pc. By importing a subsection of the module with import-module microsoft.graph.groups the number of commands that are available is greatly reduced and the import is also a lot quicker. 10 seconds to run instead of over 10 minutes from above.

Step3b – Filter left

The original search returned all groups in Office365 and then filtered them locally. In this large organization, there are a significant number of groups returned and the lookup took several minutes to run. By passing a filter parameter I was able to reduce the number of groups significantly.

Unfortunately the filter parameter does not support accesstype or the primarysmtpaddress so these have to be filtered out by piping the groups to a select-object statement.

Get-UnifiedGroup -ResultSize Unlimited | Where-Object { $_.primarySmtpAddress -match 'companyname.onmicrosoft.com' -and $_.accesstype -ne 'Private' -and $_.HiddenFromAddressListsEnabled -ne 'true' }

becomes

$groups=get-unifiedgroup -filter {(hiddenfromaddresslistsenabled -ne $true)} | where-object {$_.primarysmtpaddress -match 'companyname.onmicrosoft.com' -and $_.accesstype -ne 'Private'} 

After making this change, the groups were returned in less than a minute.

Step3c – Changing from set-unifiedgroup to Update-MgGroup

The new command to modify the group is update-mggroup but the standard command does not have the ability to change the access type as per the documentation at Update-MgGroup (Microsoft.Graph.Groups) | Microsoft Learn

Screenshot for the update-MgGroup command that is missing the AccessType parameter

However, after switching the document to the Beta version of the api in the dropdown menu on the left, the accesstype parameter becomes available. The above screenshot shows AccessType is missing vs the screenshot below that includes this option.

Screenshot of the update-MgGroup beta command that includes the AccessType parameter

We therefore end up with the following commands to set the profile to Beta, load the Microsft.Graph.Groups subset of the module and then connect to Microsoft. Graph

Select-MgProfile -Name "beta"
import-module microsoft.graph.groups
connect-mggraph -clientid "1a2b3c4d5e-1234-1a2c3-a1aa-aa12b3456c7d" -tenantid companyname.onmicrosoft.com -certificatethumbprint "0a4f....fe"

I had issues with the next bit of code and ended up using my Exchange online connections to retrieve the groups that matched the criteria of not being hidden from the address list and where the access type was not private, and then using the ExternalDirectoryObjectID from those groups in the update-mggroup command from the graph module.

In theory I should have been able to search using the get-mggroup command but I was having issues getting the filters and search to work correctly. I could not get any results to come back for searches that included the companyname.onmicrosoft.com email address. As soon as I added that to the criteria the results came back empty. Due to time constraints I used the (admittedly) messy option of using Exchange to grab the groups and graph to update them.

$groups=get-unifiedgroup -filter {(hiddenfromaddresslistsenabled -ne $true)} | where-object {$_.primarysmtpaddress -match ‘companyname.onmicrosoft.com’ -and $_.accesstype -ne ‘Private’}

foreach ($group in $groups) {
update-mggroup -groupid $group.ExternalDirectoryObjectId -accesstype "Private" -HideFromAddressLists
}

Finally, the script was completed by disconnecting the Graph and the Exchange connections

get-pssession | Remove-PSSession
Disconnect-MgGraph
Stop-Transcript

Using the transcript option at the beginning of the script really helped in debugging this code as it’s meant to run from a scheduled task and viewing the transcript enabled me to see what the issue was and then decide to test further in an interactive session.

Fixed: The trust relationship between this workstation and the primary domain failed

Login dialog box showing The trust relatiionship between this workstation and the primary domain failed.

Yes, this old chestnut! Had this issue today on a server, but for some reason the standard netdom resetpwd command would not work.

Running the command netdom resetpwd /s:servername /ud:domain\user /pd:* would give me the error message “The machine account password for the local machine could not be reset”

Powershell to the rescue and the equivalent commands running on the affected machine fixed the issue

$c=get-credential

test-computersecurechannel -repair -credential $c

shutdown /f /r /t 3

Unfortunately I’ve had to this multiple times in the past and it’s about time I blogged the solution for my own reference in the future

Fixed: 161008 The source virtual machine doesn’t have a network interface or all the network interfaces were deleted when using Azure Migrate

I’ve been working on an Azure Migrate project at work this week and had an interesting issue after attempting to start a replication of the source servers. The configurations were brought in from the Azure Migrate assessment tool but I received an odd error that there was no connected network interface on the source server.

This is a very strange error as all the source servers do have network interfaces otherwise there would not be much point in migrating them up to Azure! The error id 161008 and messages of “No connected network interface is configured for the virtual machine” and “The source virtual machine doesn’t have a network interface or all the network interfaces were deleted” did not make much sense, however the recommendation of “If there is no network interface on the source machine, add one and then go to Computer and Network settings of the virtual machine to configure the network interface” was a slight clue.

error id 161008 and messages of No connected network interface is configured for the virtual machine" and The source virtual machine doesn't have a network interface or all the network interfaces were deleted

Part of the solution steps imply that you create a nic on the server, but as the server has not actually been created in Azure yet, this step is not possible and the source server obviously has nic’s already setup so no change can be made on that server.

After getting a second pair of eyes on the issue (Thanks A!) , we had an Aha moment in the Compute and Network section of the server setup. The Assessment had set the nic’s on the machine to Do not Create and Secondary Network. As there was no primary nic configured on this page, the error message above is generated. Setting the Secondary nic to Primary rather than Secondary enabled the replication to start successfully.

Screenshot of configuring Compute and Network for an Azure migrate server

2 lessons from this – Always ensure you have a primary nic configured when using Azure Migrate. Get a second pair of eyes for that fresh look at the problem as sometimes you just can’t see the wood for the trees.

Fixed: ScreenConnect / Control missing from Labtech / Automate

Automate screenshot

For the past two days my Automate window was missing all of the Screenconnect plugins that allow one click remote access to client machines. Both the one that shows at the top of the computer list and also when the machine window is launched. (Screenshot below shows how it should look)

Screenshot showing the control icon in Automate for computers

A reinstall of the software (including renaming the left over Labtech files in Program files and Program Data after removing the software) did not fix the issue.

However, reviewing the C:\ProgramData\LabTech Client\Logs\yyyymmdd_LTcErrors.txt showed lots of plugin exceptions including the following:-

An attempt was made to load an assembly from a network location which would have caused the assembly to be sandboxed in previous versions of the .NET Framework. This release of the .NET Framework does not enable CAS policy by default, so this load may be dangerous. If this load is not intended to sandbox the assembly, please enable the loadFromRemoteSources switch. See http://go.microsoft.com/fwlink/?LinkId=155569 for more information

Following that link provided the hint that loadFromRemoteSources needs to be enabled.

Editing “C:\Program Files (x86)\LabTech Client\LTClient.exe.config” and adding <loadFromRemoteSources enabled=”true”/> just before the /runtime> line, Automate now includes the control button.

LTClient config file showing the loadfromremotesources element

Fixed: NPS using Azure AD not prompting for 2 factor on phone

Screenshot of Yubico numbers for 2FA verification

We were recently came across an issue with configuring the NPS (Network Policy Server) to use Azure AD’s 2FA authorization to validate VPN access to one of our clients. The initial configuration was fairly straightforward with the instructions at https://docs.microsoft.com/en-us/azure/active-directory/authentication/howto-mfa-nps-extension but after connecting to the VPN server, we were not getting the push notification to our phone for the final verification steps.

Going through the Network Policy Server logs in event viewer we saw an error message as follows ” NPS Extension for Azure MFA: CID: 341b704d-03f1-4ba6-ae92-eb19ae2f2bf3 :Exception in Authentication Ext for User myusername :: ErrorCode:: CID :341b704d-03f1-4ba6-ae92-eb19ae2f2bf3 ESTS_TOKEN_ERROR Msg:: Verify the client certificate is properly enrolled in Azure against your tenant and the server can access URL in Registry STS_URL. Error authenticating to eSTS: ErrorCode:: ESTS_TOKEN_ERROR Msg:: Error in retreiving token details from request handle: -895352831 AADSTS7000112: Application ‘981f26a1-7f43-403b-a875-f8b09b8cd720′(Azure Multi-Factor Auth Client) is disabled. “

The key was the last line – Azure Multi Factor Auth Client is disabled. Despite the fact that 2FA was already in use to verify access to the Office365 portal and desktop apps, it seems that the client was not enabled in Office365.

This was fixed by running the following in a powershell window connected to Azure AD..

Set-MsolServicePrincipal -AppPrincipalId “981f26a1-7f43-403b-a875-f8b09b8cd720” -AccountEnabled $True
Set-MsolServicePrincipal -AppPrincipalId “1f5530b3-261a-47a9-b357-ded261e17918” -AccountEnabled $True

This then enabled 2FA to work with NPS. I put in a PR request to the official documentation to have this as an official troubleshooting step but the PR was closed. Hopefully this post and the PR will help others in their configuration as it did seem to be a fairly common problem.

Fixed – Screenconnect blocked by Windows Smartscreen

Due to an expired code sign certificate, the version of Screenconnect that is launched from Connectwise Automate (aka Labtech) fails to run on 2 of my Windows 10 machines but works fine on the rest of the machines. The error message “Your administrator has blocked this application because it potentially poses a security risk to your computer”. The ones that fail are running Windows 1809 and 1903 so I suspect that there is some of the new features of SmartScreen are enabled and older versions do not have these settings.

Your administrator has blocked this application because it potentially poses a security risk to your computer

Checking out the file used for Screenconnect, I saw that the certificate used to sign the exe file expired on February 1st this year, but I’m not sure why my machines suddenly started to refuse to run it the last few days of March.

The Screenconnect.WindowsClient.exe is downloaded to a random subdirectory of appdata\local\apps\2.0 so I recommend you navigate to this directory and then search for *.exe and check the correct screenconnect file as per the screenshot below which shows the certificate expiring on the 1st February

ScreenConnect certificate expiry dates

After searching around and contacting Connectwise Support they advised me this would be fixed in an upcoming version. In the meantime setting the registry value HKEY_LOCAL_MACHINE\SOFTWARE\Microsoft.NETFramework\Security\TrustManager\PromptingLevel\Internet to a string type of Enabled will allow the ClickOnce application to popup and this allows the dialog box to give an option as to whether the file should be run or not (the previous setting was Disabled). This then allows the user to select yes to install and run the file overriding the invalid SSL certificate.

Obviously this is not a great idea but it does allow you to run Screenconnect from within the Automate window. (The other alternative is to use the Screenconnect website itself to connect).

Prepping for MSIgnite – Review the session plans.

In just over a month I will be heading down to Florida for Microsoft Ignite (#MSIgnite) – the conference formerly known as TechEd. This is a conference that I’ve always wanted to go to and this year I am finally able to get to go.
It’s a large Microsoft based conference and I know I am going to learn a ton and be extremely tired at the end of the work.

As this is my first visit, I thought I would add some notes over the next few weeks on my planning for #msignite. Feel free to follow along and add any comments and advice to the posts.

Review the session plans

Last week the Myignite site had the session planner activated – there are currently 1124 sessions planned right now and it is essential that you plan the sessions that need to be attended before you go to the conference.
One of the attendees has also released a PowerBI app that gives a really nice graphical browser view to the sessions in a calendar view – This is a browser option only though and doesn’t allow you to add sessions to your calendar/planner.

Neat graphical viewer for #MSIgnite sessions
1500 sessions is pretty overwhelming so I would recommend that you select the subject matter(s) that you are particularly interested in as that will then filter down the list of relevant sessions.

Don’t get too excited and expect the number to drop drastically, especially if you are involved in a lot of subjects. My list of sessions went from 1500 to 540 to pick from.
Select the Personalized sessions edit icon at Personalized session to select the topics you are interested in.

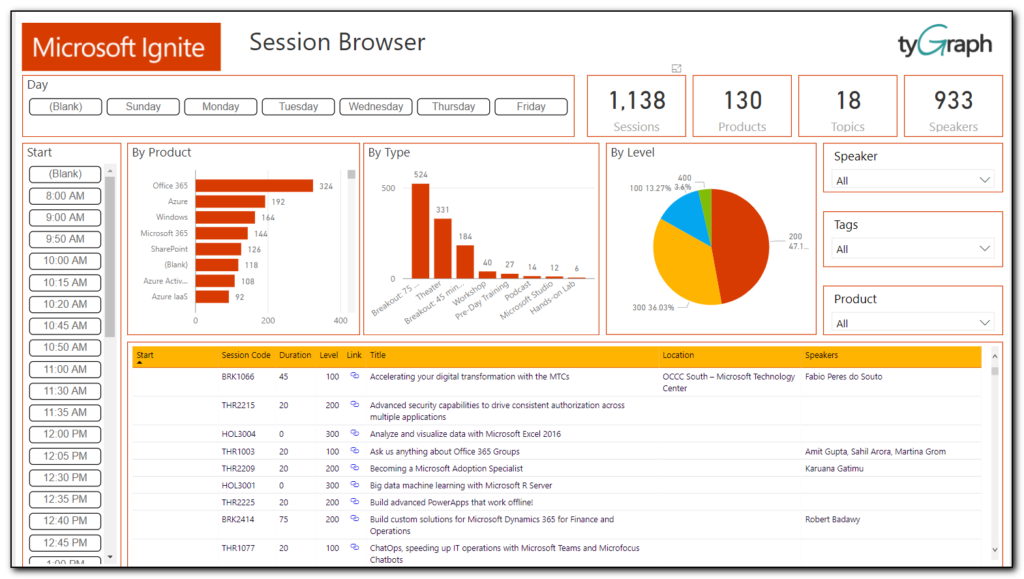
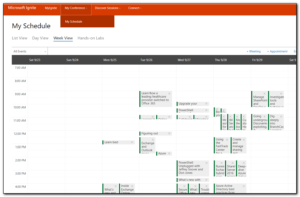
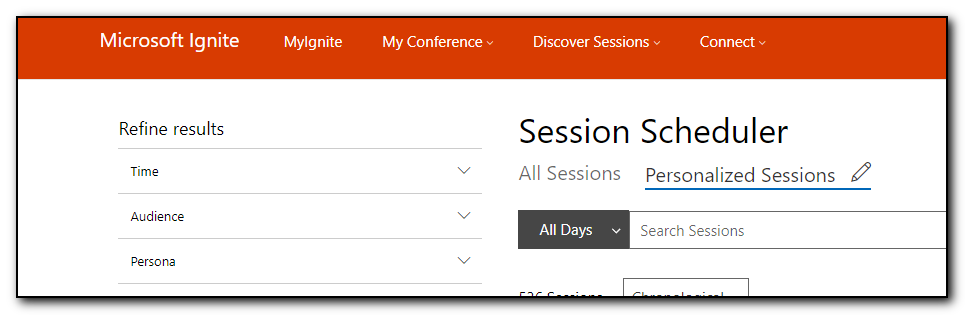
I then went through this list and selected the option to add to schedule option to select all the sessions I am interested in. Some of these sessions are ones that I would want to download and view later, some of them are ones that I want to attend. Right now I do not see a way of prioritizing these sessions as must attend, 1st choice, stream later – hopefully this is possible in the future.

Once you have selected all of the sessions you are interested in, go to my schedule under My Conference/My Schedule and then select the week view. This is where you see that you have probably double, triple or quadruple booked your sessions. This is where the priority options would come in handy so a colour coded view would allow you to see which sessions you really want to go to.

Weekly schedule in Ignite.

Last year there was a mobile app that would help you keep up to date with session changes (there has already been several changes published to the conference page) but I don’t see it available at the moment – there are plenty of ignite 2017 apps in the Google store but none of them are the Microsoft ones (at time of writing)