Tag Archives: Scripting

Using Microsoft Graph Update-MgGroup with Certificate Based Authentication as a working alternative for Set-UnifiedGroup

Yesterday I had a fun time converting a PowerShell script that used the set-unifiedgroup powershell command that was originally running with basic authentication, to a script that would run using certificate based authentication so it can run against a tenant that uses Modern Authentication for office365.

There were quite a few hurdles to overcome so hopefully this helps other people.

Step 1 – Fix Office365 logins

Blank browser page that loads when attempting to log into Office365

The computer was initially generating a blank white page on the screen when attempting to log into the Office365 or Azure portal. This was resolved by resetting the browser settings in Control Panel / Internet Options. Clearing cookies and temporary internet files did not help for this step.

Step2 – Connect to Office365.

The ExchangeOnline module was already installed on the computer, but needed to be updated with

 update-Module -Name ExchangeOnlineManagement

The rest of this phase reduced the previous 5+ lines of code to log into Office365 to a one liner. There are quite a few steps involved in this, but App-only authentication in Exchange Online PowerShell and Security & Compliance PowerShell | Microsoft Learn is a good document to follow. Make sure that the SSL certificate is documented somewhere so that you get a reminder *before* the certificate expires. Once the certificate is uploaded to Azure and permissions are set it is possible to connect with

connect-exchangeonline -CertificateThumbprint "1a2b3c4d5e6f....." -appid "123abc-456def...." -organization "companyname.onmicrosoft.com"

Initially I thought that would be it, but after running the script I discovered the next big snag –

Step3 – Converting set-unifiedgroup to MS Graph module equivalent

The script gathered a list of Microsoft 365 distribution groups (or UnifiedGroups) in Office365 that had their access level not set to private and changed them to be private. The previous code was this

Get-UnifiedGroup -ResultSize Unlimited | Where-Object { $_.primarySmtpAddress -match 'companyname.onmicrosoft.com' -and $_.accesstype -ne 'Private' -and $_.HiddenFromAddressListsEnabled -ne 'true' } | Set-UnifiedGroup -AccessType Private -HiddenFromAddressListsEnabled $true -verbose

However, set-unifiedgroup is one of a few commands that cannot be used with Certificate Based Authentication and the msgraph module has to be used instead. The Microsoft documentation points this out but does not provide helpful information on how to actually get this accomplished. The linked information refers to api calls rather than using actual Microsoft Graph PowerShell commands and there were several gotchas in this process (hence this blog post).

First the Microsoft graph module needs to be installed on the computer with

Install-Module Microsoft.Graph

Step3a – Importing Microsoft.Graph.Groups

When importing the Microsoft.Graph module on the machine into PowerShell , not only did it take over 10 minutes to import, an error message is generated stating

Import-Module : Function Get-MgUserContactFolderChildFolderContactMultiValueExtendedProperty cannot be created because<br>function capacity 4096 has been exceeded for this scope.
Screenshot error stating Import-Module : Function Get-MgUserContactFolderChildFolderContactMultiValueExtendedProperty cannot be created because
function capacity 4096 has been exceeded for this scope.

This is due to the sheer number of commands available in the module and PowerShell 5.1 has a limit to the number of commands that can be used. Using PowerShell 7 is one way of fixing that issue but I was trying to reduce the amount of changes being made to this pc. By importing a subsection of the module with import-module microsoft.graph.groups the number of commands that are available is greatly reduced and the import is also a lot quicker. 10 seconds to run instead of over 10 minutes from above.

Step3b – Filter left

The original search returned all groups in Office365 and then filtered them locally. In this large organization, there are a significant number of groups returned and the lookup took several minutes to run. By passing a filter parameter I was able to reduce the number of groups significantly.

Unfortunately the filter parameter does not support accesstype or the primarysmtpaddress so these have to be filtered out by piping the groups to a select-object statement.

Get-UnifiedGroup -ResultSize Unlimited | Where-Object { $_.primarySmtpAddress -match 'companyname.onmicrosoft.com' -and $_.accesstype -ne 'Private' -and $_.HiddenFromAddressListsEnabled -ne 'true' }

becomes

$groups=get-unifiedgroup -filter {(hiddenfromaddresslistsenabled -ne $true)} | where-object {$_.primarysmtpaddress -match 'companyname.onmicrosoft.com' -and $_.accesstype -ne 'Private'} 

After making this change, the groups were returned in less than a minute.

Step3c – Changing from set-unifiedgroup to Update-MgGroup

The new command to modify the group is update-mggroup but the standard command does not have the ability to change the access type as per the documentation at Update-MgGroup (Microsoft.Graph.Groups) | Microsoft Learn
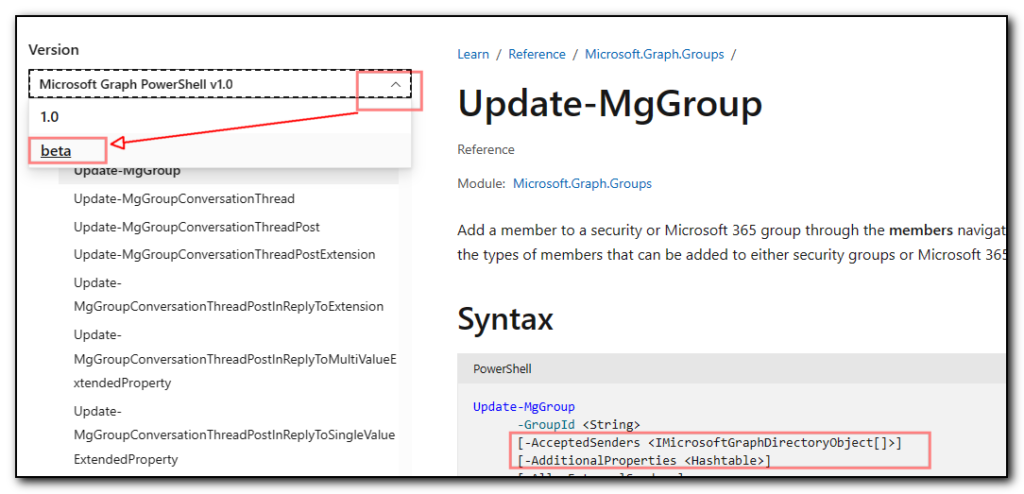
Screenshot for the update-MgGroup command that is missing the AccessType parameter

However, after switching the document to the Beta version of the api in the dropdown menu on the left, the accesstype parameter becomes available. The above screenshot shows AccessType is missing vs the screenshot below that includes this option.

Screenshot of the update-MgGroup beta command that includes the AccessType parameter

We therefore end up with the following commands to set the profile to Beta, load the Microsft.Graph.Groups subset of the module and then connect to Microsoft. Graph

Select-MgProfile -Name "beta"
import-module microsoft.graph.groups
connect-mggraph -clientid "1a2b3c4d5e-1234-1a2c3-a1aa-aa12b3456c7d" -tenantid companyname.onmicrosoft.com -certificatethumbprint "0a4f....fe"

I had issues with the next bit of code and ended up using my Exchange online connections to retrieve the groups that matched the criteria of not being hidden from the address list and where the access type was not private, and then using the ExternalDirectoryObjectID from those groups in the update-mggroup command from the graph module.

In theory I should have been able to search using the get-mggroup command but I was having issues getting the filters and search to work correctly. I could not get any results to come back for searches that included the companyname.onmicrosoft.com email address. As soon as I added that to the criteria the results came back empty. Due to time constraints I used the (admittedly) messy option of using Exchange to grab the groups and graph to update them.

$groups=get-unifiedgroup -filter {(hiddenfromaddresslistsenabled -ne $true)} | where-object {$_.primarysmtpaddress -match ‘companyname.onmicrosoft.com’ -and $_.accesstype -ne ‘Private’}

foreach ($group in $groups) {
update-mggroup -groupid $group.ExternalDirectoryObjectId -accesstype "Private" -HideFromAddressLists
}

Finally, the script was completed by disconnecting the Graph and the Exchange connections

get-pssession | Remove-PSSession
Disconnect-MgGraph
Stop-Transcript

Using the transcript option at the beginning of the script really helped in debugging this code as it’s meant to run from a scheduled task and viewing the transcript enabled me to see what the issue was and then decide to test further in an interactive session.

Retrieve Mailbox Migration errors for Office365

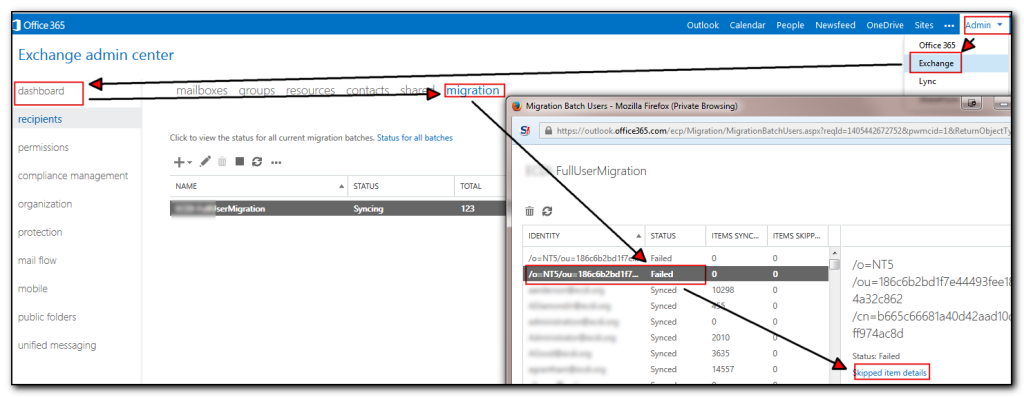
When you have a lot of mailboxes to migrate, Microsoft’s provided method of viewing the errors involves a tedious amount of clicking by logging into the portal, selecting Exchange, Migration, View details, scroll down to find a failure, select the user, click view details.

Viewing Migration status in Office365


Rather than use the tedious method of going into the details, selecting a user and then viewing details, run the following powershell script (once connected using the previous office365 connection script)

get-migrationuser -status failed  | get-migrationuserstatistics | select identity,emailaddress,recipienttype, error,bytestransferred |export-csv c:\temp\migrationstatus.csv

I also have a simple loop that gets me the status once an hour. Obviously change the email address’s appropriately.

while (1)
{
$a=(get-migrationuser | out-string)
send-mailmessage -to [email protected] -subject “Company Migration Stats” -from [email protected] -smtpserver my.mailserver.com  -body $a
start-sleep -seconds 3600
}

Fixed – Office365 journalling does not work for one user

I’ve been working on a case with Microsoft’s Office365 support for several weeks trying to find out why email sent *to* a particular user was not being journalled. All the other mail seemed to be journalled to the external recipient, email from the user was working, just not email to that user.

The experience was quite frustrating as Microsoft’s support were terrible at calling back and could not grasp the concept of email tracking. Their solution after making a change was to wait a day to see if it was fixed although it was quite apparent that the Microsoft servers were not even trying to send the email (by looking at the Trace Logs you can see what email was being sent and received).

After checking the connectors were setup, mail properly scoped, the user had no rules on their mailbox, Microsoft’s solution was to delete the mailbox and reset it up again.  Not so easy when the mailbox/user is federated with Active Directory and the user happens to be the owner of the company. That was not a conversation I was going to have with them!

The only thing that was different with this user was that in troubleshooting this issue we had set the user up to receive the journalling non delivery reports. I figured that if the emails were not being delivered, maybe sending him the errors would help. However no reports were being received either.  However, according to KB 2829319 this behaviour can be seen. Although I had removed the journal receipient in the web gui, the emails were still not being journalled until I added another external email address to the configuration using the powershell command set-transportconfig -JournalingReportNdrTo [email protected]

At this point, all the email started to be journalled.

Note that we only added the recipient into the mix when I was trying to work on the initial problem so it looks like this wasn’t the only fix.

The other thing we did was change the outboundconnector to be onpremises. Changing the setting in the GUI we then ran Set-OutboundConnector archivemymailconnector -routeAllmessagesviaonpremises $true.


These two combinations seemed to fix the issue.

One thing I also learnt was that it is really useful to send multiple emails between changes and keep the subject line starting the same. Use the date/time at the end of the email. That way you can sort the email logs by Subject and just pick out the ones you were working on. By having the subject start with zzz followed by Round X (ie zzz Round 1 – change connector – 1345pm and zzz Round 1 – change connector 1346pm ) then the results are likely to appear at the end of your mail logs if you sort by subject.  Sorting by Date was not always a good idea as mail flow could occur between mail coming into the server and mail leaving the server.


Retrieve user friendly list of users who have full access to a particular mailbox in Office365

We had a request to provide a list of users who have Full access to a mailbox in Office 365. The get-mailboxpermission is pretty straightforward, but the results show the Windows username as opposed to the descriptive name for the user. The following script should provide the information needed. Note that the first 3 lines connect to Microsoft Online (you will be prompted for username and password) – the last two are the magic ones. Replace “User name” with the users first and last name ie “Andy Helsby” in my case

$LiveCred = Get-Credential
$Session = New-PSSession -ConfigurationName Microsoft.Exchange -ConnectionUri https://ps.outlook.com/powershell/ -Credential $LiveCred -Authentication Basic -AllowRedirection
Import-PSSession $Session

$userlist = Get-Mailbox "user name" | Get-MailboxPermission | Where-Object { ($_.AccessRights -eq "Fullaccess") -and ($_.IsInherited -eq $false) -and -not ($_.User -like "*nt authorityself*") }
$userlist | foreach {get-mailbox $_.user}

If I can work it out, I’ll update the script later to provide a report for all mailboxes – in the meantime this works for 1 mailbox at a time.

Funnily enough, this report didn’t actually help the reason we were asked for the report – that was because the user had issues connecting to someone else’s mailbox. It turns out that the Microsoft Online password had been changed and outlook was using the cached credentials. By removing the stored passwords in the control panel, Outlook prompted for the password and everything started working.

Fixed: Remove extra ip address from commandline.

Occasionally you may have a need to remove an additional ip address that has been assigned to a network card. For example you might have a card listening on two ip address’s – say 192.168.1.2 and 192.168.1.3
You can remove this from the gui but there may be reasons where the gui is not available but access to the server via psexec (or the Windows 2008R2 core mode) is the only access to the server that you have.
To remove the ip address just type in
netsh interface ipv4 delete address “Local Area Connection” addr=192.168.1.3

Simple as that but it took a while stepping through the netsh commands to get the correct syntax for this. I use netsh for switching my laptop to customer ip ranges for troubleshooting when on their lan or when configuring switches, but this is the first time I’ve had the requirement to remove an extra ip address.

Commenting out command in batch file gotcha.

I’ve been working on a batch file script (yes I know I am meant to be using powershell) and kept getting a “The syntax of the command is incorrect”.

My code is as follows:-

reg query “hklm\software\microsoft\windows\currentversion\windowsupdate\auto update\Rebootrequired”
if not errorlevel 1 (
::theKey exists therefore we need to do a reboot
echo reboot is required from previous windows updates.
)

The :: is a quick and tidy shortcut to rem out a statement in a batch file.

However – today I found out that you cannot use this trick within an if statement. Instead the :: needs to become rem

So the script becomes

if errorlevel 1 (
rem theKey exists therefore we need to do a reboot
echo reboot is required from previous windows updates.
)

For what it’s worth this is a snippet of code from a script that detects if windows updates are required, installs them, emails the log file and then reboots if required. The step above comes from a recent discovery that the patch detection returns no patches needed if the server is still in a pending reboot after patches were applied (typically because the shutdown failed to take place)

Geocaching.com to Flickr greasemonkey script updated.

I updated my Geocaching.com greasemonkey script to work with the new cache names. This script automatically links to the flickr photos tagged with the geocache name ie GC1NMKA
When I first wrote the script back in 2005 I knew very little about greasemonkey scripts and unfortunately not a lot has changed. However I realized that the script broke as it was looking for the characters GC followed by 4 uppercase alphanumeric characters. New caches now have 5 characters so I needed to fix this.

A quick change to the script now looks for GC followed by any number of uppercase alphanumeric characters and can be found by going to geocache2flickr with a greasemonkey enabled browser and installing the script. This will be the official location but will also be available on the userscripts.org website.
Screenshot of geocaching.com website showing link to flickr page