Month: September 2013

Pimp your Powershell Prompt

I use powershell a lot at work – I’m not a guru by any means and I often find it hard to remember the commands I have run in a session, either for future use or for documenting in my time sheet (which also acts as a point of reference for future helpdesk tickets).

When I started going through the Powershell in a month of lunches book (which I highly recommend or the Powershell v3 book) I decided to use the start-transcript commandlet to record all my powershell activities.  This worked very well until I would scroll through several screens worth and then forget what file I had saved my transcript too.  There was also the possibility of forgetting to transcript everything.

By using the powershell profile file I was able to enter the commands to automatically set the transcript to the current date. I was then able to modify the title of the powershell prompt to display the filename so I could always see where the file was saved with the added bonus of a variable being used if I ever needed to open the transcript

My next step was to include the time in the powershell prompt – this enables me to go back through the transcript and see how long it took to run the commands for my timesheet entries.  Remembering back to the good old dos days, I remembered the prompt command. A quick bit of experimenting with the Date command I had the current time displayed at the beginning on the Powershell prompt. Note this is displayed after the previous command is run, so technically it’s not the exact current time, but the time that the prompt was displayed on the screen.

The final profile script can be copy/pasted into notepad by typing in

notepad $profile

is as follows:-

cd \andy\powershellinamonthoflunches

$log="c:\temp\powershelllogs-" + $env.username + (get-date -uformat "%y%m%d-%H%M") + ".txt"
start-transcript $log
$host.ui.rawui.WindowTitle = $log

function prompt
{
write-host ((Date -uformat %T).ToString() + "PS " +$(get-location) + ">") -nonewline
return " "
}

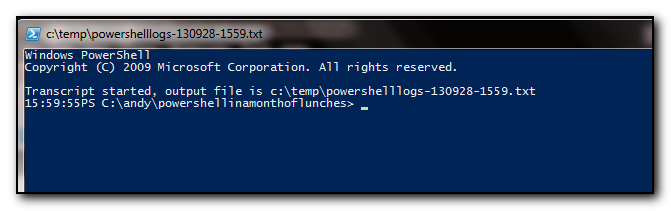
This ends up with a powershell prompt that looks like the following. Hope this brief posting inspires you to change your powershell prompt to be even more useful for you.


Powershell prompt with the filename in the title and current time in the prompt


Fixed – Office365 journalling does not work for one user

I’ve been working on a case with Microsoft’s Office365 support for several weeks trying to find out why email sent *to* a particular user was not being journalled. All the other mail seemed to be journalled to the external recipient, email from the user was working, just not email to that user.

The experience was quite frustrating as Microsoft’s support were terrible at calling back and could not grasp the concept of email tracking. Their solution after making a change was to wait a day to see if it was fixed although it was quite apparent that the Microsoft servers were not even trying to send the email (by looking at the Trace Logs you can see what email was being sent and received).

After checking the connectors were setup, mail properly scoped, the user had no rules on their mailbox, Microsoft’s solution was to delete the mailbox and reset it up again.  Not so easy when the mailbox/user is federated with Active Directory and the user happens to be the owner of the company. That was not a conversation I was going to have with them!

The only thing that was different with this user was that in troubleshooting this issue we had set the user up to receive the journalling non delivery reports. I figured that if the emails were not being delivered, maybe sending him the errors would help. However no reports were being received either.  However, according to KB 2829319 this behaviour can be seen. Although I had removed the journal receipient in the web gui, the emails were still not being journalled until I added another external email address to the configuration using the powershell command set-transportconfig -JournalingReportNdrTo [email protected]

At this point, all the email started to be journalled.

Note that we only added the recipient into the mix when I was trying to work on the initial problem so it looks like this wasn’t the only fix.

The other thing we did was change the outboundconnector to be onpremises. Changing the setting in the GUI we then ran Set-OutboundConnector archivemymailconnector -routeAllmessagesviaonpremises $true.


These two combinations seemed to fix the issue.

One thing I also learnt was that it is really useful to send multiple emails between changes and keep the subject line starting the same. Use the date/time at the end of the email. That way you can sort the email logs by Subject and just pick out the ones you were working on. By having the subject start with zzz followed by Round X (ie zzz Round 1 – change connector – 1345pm and zzz Round 1 – change connector 1346pm ) then the results are likely to appear at the end of your mail logs if you sort by subject.  Sorting by Date was not always a good idea as mail flow could occur between mail coming into the server and mail leaving the server.


Fixed: Office 2010 installation with MAK key gives Error: Can’t decode PIDKey – Invalid digits! ErrorCode: 0(0x0)

After doing an administrative installation of Office Professional Plus 2010 for a client, I was trying to test the installation of office on a desktop machine but kept getting “Error: Can’t decode PIDKey – Invalid digits! ErrorCode: 0(0x0).” as the error message. I confirmed that the key was correct by doing a manual installation of the software and using the same product key that was successful. I was unable to find any useful pages on the internet with this error message so ended up logging a call with Microsoft Product Support to troubleshoot the installation.

Our troubleshooting steps were to remove the updates folder completely and try an installation – this worked so we knew the problem was in the updates directory. Recopying back the files from the extracted service pack 1 dvd worked successfully so the problem was either service pack 2 or the setup.msp file. I copied back the sp2 files and again the software installed successfully (note that having a virtual test pc makes these tests very easy. No uninstalling of office required!)  Again the installation was successful. I then copied the setup.msp file back into the updates directory and the installation failed again. As the configurations that are made in the setup.msp can either be set in the config.xml or group policy it was ok to proceed without using the setup.msp.

Full details of the log files and more information can also be found at the Microsoft forums where I posted the initial request for help.