Fixed: The trust relationship between this workstation and the primary domain failed

Login dialog box showing The trust relatiionship between this workstation and the primary domain failed.

Yes, this old chestnut! Had this issue today on a server, but for some reason the standard netdom resetpwd command would not work.

Running the command netdom resetpwd /s:servername /ud:domain\user /pd:* would give me the error message “The machine account password for the local machine could not be reset”

Powershell to the rescue and the equivalent commands running on the affected machine fixed the issue

$c=get-credential

test-computersecurechannel -repair -credential $c

shutdown /f /r /t 3

Unfortunately I’ve had to this multiple times in the past and it’s about time I blogged the solution for my own reference in the future

Fixed: 161008 The source virtual machine doesn’t have a network interface or all the network interfaces were deleted when using Azure Migrate

I’ve been working on an Azure Migrate project at work this week and had an interesting issue after attempting to start a replication of the source servers. The configurations were brought in from the Azure Migrate assessment tool but I received an odd error that there was no connected network interface on the source server.

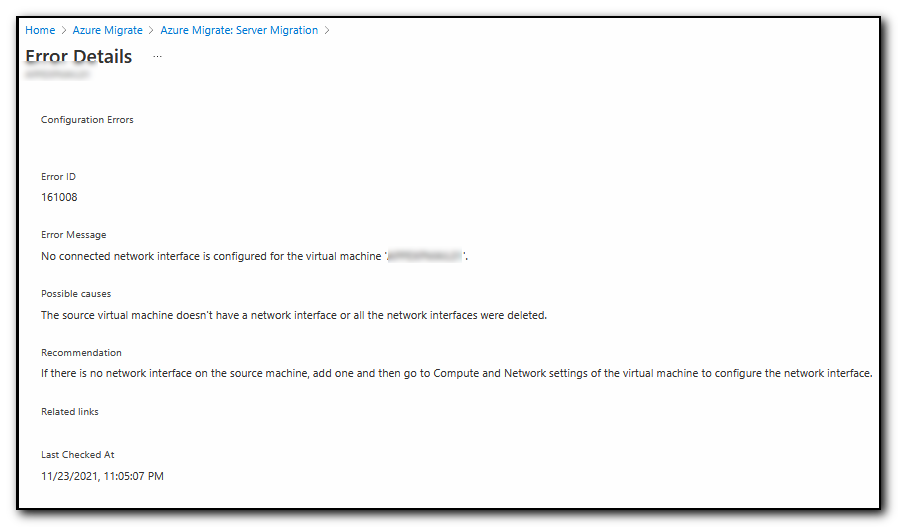
This is a very strange error as all the source servers do have network interfaces otherwise there would not be much point in migrating them up to Azure! The error id 161008 and messages of “No connected network interface is configured for the virtual machine” and “The source virtual machine doesn’t have a network interface or all the network interfaces were deleted” did not make much sense, however the recommendation of “If there is no network interface on the source machine, add one and then go to Computer and Network settings of the virtual machine to configure the network interface” was a slight clue.

error id 161008 and messages of No connected network interface is configured for the virtual machine" and The source virtual machine doesn't have a network interface or all the network interfaces were deleted

Part of the solution steps imply that you create a nic on the server, but as the server has not actually been created in Azure yet, this step is not possible and the source server obviously has nic’s already setup so no change can be made on that server.

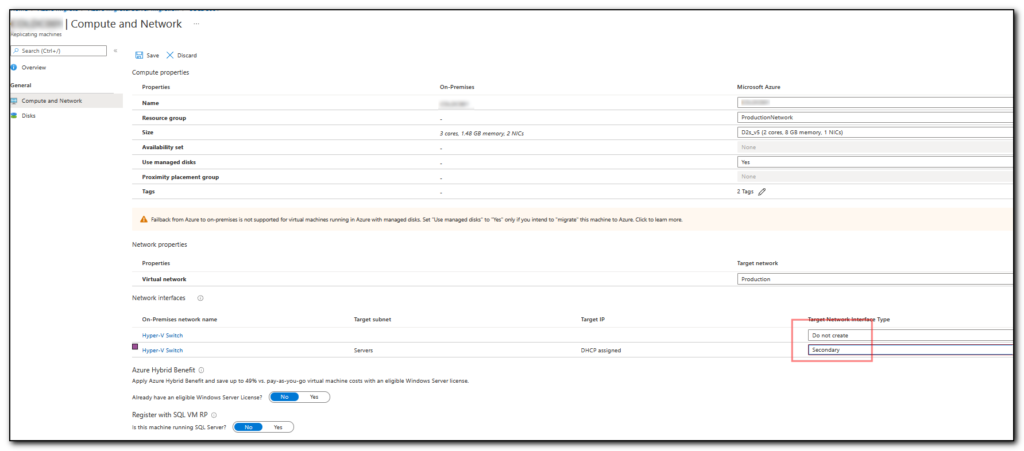
After getting a second pair of eyes on the issue (Thanks A!) , we had an Aha moment in the Compute and Network section of the server setup. The Assessment had set the nic’s on the machine to Do not Create and Secondary Network. As there was no primary nic configured on this page, the error message above is generated. Setting the Secondary nic to Primary rather than Secondary enabled the replication to start successfully.

Screenshot of configuring Compute and Network for an Azure migrate server

2 lessons from this – Always ensure you have a primary nic configured when using Azure Migrate. Get a second pair of eyes for that fresh look at the problem as sometimes you just can’t see the wood for the trees.

Fixed: The Active Directory schema isn’t up-to-date, and this user account isn’t a member of the ‘Schema Admins’ and/or ‘Enterprise Admins’ groups.

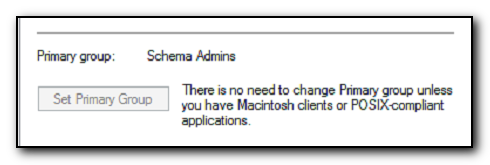
Setting Primary Group to Schema Admins

Attempting to run an Exchange CU update on a server this morning and the server kept giving “The Active Directory schema isn’t up-to-date, and this user account isn’t a member of the ‘Schema Admins’ and/or ‘Enterprise Admins’ groups” error message when attempting to run setup.exe /Prepareschema /IacceptExchangeServerLicenseTerms as a pre-requisite installation step. My user account was a member of both of the groups but the error still occurred.

Changing the accounts primary group in Active Directory by selecting the Member Of tab and then selecting the Schema Admins group and selecting Set Primary Group, logging off and back on again led to the setup process completing successfully.

Don’t forget to set it back after the installation has completed.

Fixed: Powershell prompts to run scripts when importing sessions – change %temp%

Powershell Security warning

My new work computer has had issues attempting to run Office365 commands for a while. After successfully connecting to Office365, using connect-exchangeonline (as an example), I would get a security warning – “Run only scripts that you trust. While scripts from the internet can be useful, this script can potentially harm your computer. If you trust this script, use the Unblock-File cmdlet to allow the script to run without this warning message. Do you want to run c:\temp\temp\tmp_rnncyvj4.v10\tmp_rnncyvj4.v10.format.ps1xml?
[D] Do not run [R] Run once [S] Suspend [?] Help (default is “D”):

And this would repeat with the appropriate .psm1 file too.

The usual solution is to use unblock-file or set-executionpolicy -remotesigned.

However, in this case the files are dynamically downloaded and will have a different filename everytime and setting the execution policy did not make any difference.

I ended up changing my temp folder from c:\temp\temp to c:\andy\temp and now I no longer get prompted.

Very odd behaviour that is not too annoying until you run scripts across all the office365 tenants!

Fixed: ScreenConnect / Control missing from Labtech / Automate

Automate screenshot

For the past two days my Automate window was missing all of the Screenconnect plugins that allow one click remote access to client machines. Both the one that shows at the top of the computer list and also when the machine window is launched. (Screenshot below shows how it should look)

Screenshot showing the control icon in Automate for computers

A reinstall of the software (including renaming the left over Labtech files in Program files and Program Data after removing the software) did not fix the issue.

However, reviewing the C:\ProgramData\LabTech Client\Logs\yyyymmdd_LTcErrors.txt showed lots of plugin exceptions including the following:-

An attempt was made to load an assembly from a network location which would have caused the assembly to be sandboxed in previous versions of the .NET Framework. This release of the .NET Framework does not enable CAS policy by default, so this load may be dangerous. If this load is not intended to sandbox the assembly, please enable the loadFromRemoteSources switch. See http://go.microsoft.com/fwlink/?LinkId=155569 for more information

Following that link provided the hint that loadFromRemoteSources needs to be enabled.

Editing “C:\Program Files (x86)\LabTech Client\LTClient.exe.config” and adding <loadFromRemoteSources enabled=”true”/> just before the /runtime> line, Automate now includes the control button.

LTClient config file showing the loadfromremotesources element

Fixed: Lastpass seems to randomly add incorrect data to Forms.

We use a web based documentation system at work and have had a couple of instances where data for companies (ie Company X) seems to have been randomly edited in forms to include data from another form (ie Company Y) in the system. In a form that had a username, password, url and notes field we discovered that a tech could go in and edit the notes (and only the notes field) and without realising it, the username and password were also being updated in the form. The tech would hit save and now the saved password was incorrect.
Thankfully the documentation system has revision histories to allow us to revert back to the previous settings. but it is still a painful process to go back and review recent changes to see which ones were genuine edits and which were changed incorrectly.

We initially blamed it on LastPass filling out data as the issue would not occur if we disabled LastPass, however a search in LastPass would not return the data that was being added to the form. It took us a while to track down, but Chris, one of our techs worked out what was going on.

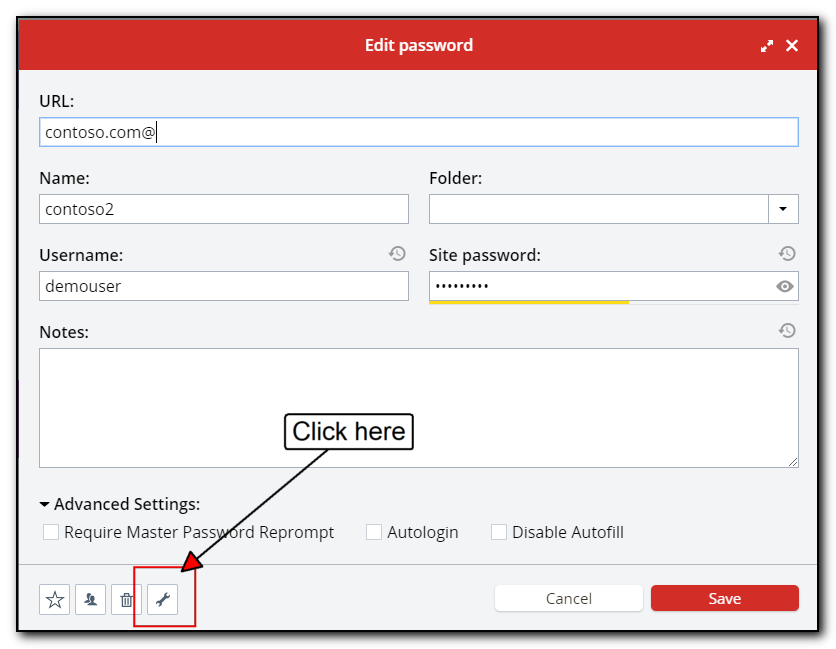
Sample lastpass password screen with extra field button highlighted

LastPass has additional fields that don’t show up when you browse (and apparently search) and the data from these extra fields were automatically being filled in for some reason. Click the wrench, highlighted in the above screenshot to see the extra hidden fields.

Our solution was to delete these extra fields, save the record in LastPass and we no longer have LastPass corrupting our data.

Fixed: NPS using Azure AD not prompting for 2 factor on phone

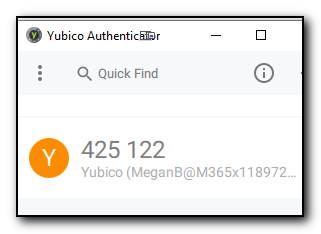
Screenshot of Yubico numbers for 2FA verification

We were recently came across an issue with configuring the NPS (Network Policy Server) to use Azure AD’s 2FA authorization to validate VPN access to one of our clients. The initial configuration was fairly straightforward with the instructions at https://docs.microsoft.com/en-us/azure/active-directory/authentication/howto-mfa-nps-extension but after connecting to the VPN server, we were not getting the push notification to our phone for the final verification steps.

Going through the Network Policy Server logs in event viewer we saw an error message as follows ” NPS Extension for Azure MFA: CID: 341b704d-03f1-4ba6-ae92-eb19ae2f2bf3 :Exception in Authentication Ext for User myusername :: ErrorCode:: CID :341b704d-03f1-4ba6-ae92-eb19ae2f2bf3 ESTS_TOKEN_ERROR Msg:: Verify the client certificate is properly enrolled in Azure against your tenant and the server can access URL in Registry STS_URL. Error authenticating to eSTS: ErrorCode:: ESTS_TOKEN_ERROR Msg:: Error in retreiving token details from request handle: -895352831 AADSTS7000112: Application ‘981f26a1-7f43-403b-a875-f8b09b8cd720′(Azure Multi-Factor Auth Client) is disabled. “

The key was the last line – Azure Multi Factor Auth Client is disabled. Despite the fact that 2FA was already in use to verify access to the Office365 portal and desktop apps, it seems that the client was not enabled in Office365.

This was fixed by running the following in a powershell window connected to Azure AD..

Set-MsolServicePrincipal -AppPrincipalId “981f26a1-7f43-403b-a875-f8b09b8cd720” -AccountEnabled $True
Set-MsolServicePrincipal -AppPrincipalId “1f5530b3-261a-47a9-b357-ded261e17918” -AccountEnabled $True

This then enabled 2FA to work with NPS. I put in a PR request to the official documentation to have this as an official troubleshooting step but the PR was closed. Hopefully this post and the PR will help others in their configuration as it did seem to be a fairly common problem.

LinkedIn no longer seems to be the preferred location to publicize new Microsoft certifications

Last week I passed my “Microsoft Certified: Azure Administrator Associate” exam. This is actually a transition exam to catch up my previous Azure certification to the state of Azure as of 2019. I had passed the original “Implementing Microsoft Azure Infrastruct Solutions” exam back in 2015 and Microsoft have now retired that certification and replaced with the Administrator associate classification. I don’t know about you, but I think the previous qualification sounds more official and impressive than just being an Associate.

The other interesting thing is that I received an email from Microsoft after passing to say I can claim my badge from Acclaim – a company I have never heard of. Nowhere in the email did it mention LinkedIn. Considering Microsoft purchased LinkedIn, I would have expected them to be pushing this platform as the place to show off the new certifications.

Not only that, but when I logged into LinkedIn, it is no longer possible to order the certifications (so the new one shows up at the bottom of the list under more…) and it doesn’t announce to LinkedIn followers that you’ve passed a certification exam.

To make matter worse, attempting to sign up for Acclaim with Chrome fails as the page does not allow you enter any password (but it works with Edge). The account also is created with my work email address rather than my personal email address that my Microsoft certifications are tied to.

By using Edge I was able to create an account. It is then possible to go into the account settings and add my Microsoft account as the primary email address, copy/pasting the confirmation link into Edge each time.

Once logged into Acclaim, it is recommended to activate 2FA under the Password section but make sure you change the description of the website to Acclaim in your 2FA app rather than leaving it as the default which is your email address.

Happy Anniversary Absoblogginlutely!

16 years ago today I registered Absoblogginlutely.net and started to blog at this location. I totally missed the fact that back in March, helsby.net became 20 years old, a domain that I registered as an early birthday present to myself and is now used as my main email service.
This means I’ve been blogging on or off for about 20 years – how time flies!
Unfortunately I’ve not been updating this blog as often as I’d like as a lot of the tweaks and discoveries that I would normally blog about have become more work related and therefore more confidential.
However I would like to get back into the habit of documenting more so watch this space.
I’m heading to the Columbus Infosec Summit on Thursday and Friday this week which has always been full of interesting talks and demonstrations. It is sold out, but the twitter tag is .

Paula Januszkiewicz is one of the keynotes this year and her presentations are always valuable with a lot of takeaways and simultaneously manages to impress and scare me with the state of IT Security nowadays.

Fixed – Screenconnect blocked by Windows Smartscreen

Due to an expired code sign certificate, the version of Screenconnect that is launched from Connectwise Automate (aka Labtech) fails to run on 2 of my Windows 10 machines but works fine on the rest of the machines. The error message “Your administrator has blocked this application because it potentially poses a security risk to your computer”. The ones that fail are running Windows 1809 and 1903 so I suspect that there is some of the new features of SmartScreen are enabled and older versions do not have these settings.

Your administrator has blocked this application because it potentially poses a security risk to your computer

Checking out the file used for Screenconnect, I saw that the certificate used to sign the exe file expired on February 1st this year, but I’m not sure why my machines suddenly started to refuse to run it the last few days of March.

The Screenconnect.WindowsClient.exe is downloaded to a random subdirectory of appdata\local\apps\2.0 so I recommend you navigate to this directory and then search for *.exe and check the correct screenconnect file as per the screenshot below which shows the certificate expiring on the 1st February

ScreenConnect certificate expiry dates

After searching around and contacting Connectwise Support they advised me this would be fixed in an upcoming version. In the meantime setting the registry value HKEY_LOCAL_MACHINE\SOFTWARE\Microsoft.NETFramework\Security\TrustManager\PromptingLevel\Internet to a string type of Enabled will allow the ClickOnce application to popup and this allows the dialog box to give an option as to whether the file should be run or not (the previous setting was Disabled). This then allows the user to select yes to install and run the file overriding the invalid SSL certificate.

Obviously this is not a great idea but it does allow you to run Screenconnect from within the Automate window. (The other alternative is to use the Screenconnect website itself to connect).