Retrieve Mailbox Migration errors for Office365

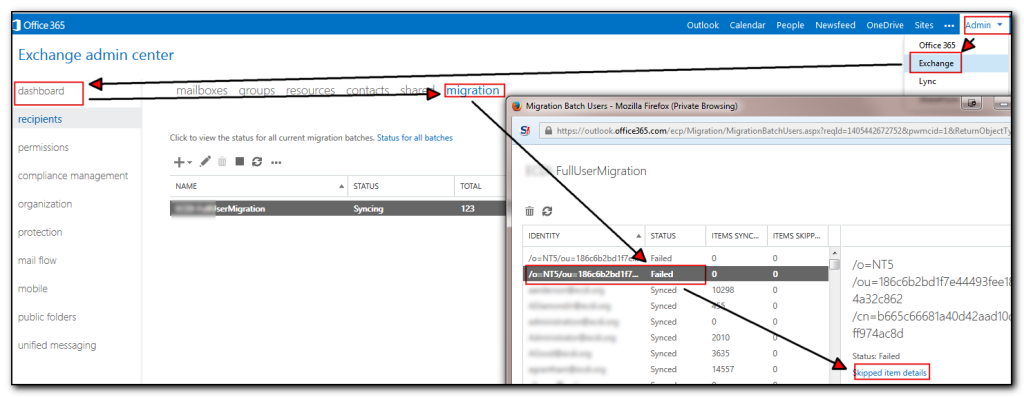
When you have a lot of mailboxes to migrate, Microsoft’s provided method of viewing the errors involves a tedious amount of clicking by logging into the portal, selecting Exchange, Migration, View details, scroll down to find a failure, select the user, click view details.

Viewing Migration status in Office365


Rather than use the tedious method of going into the details, selecting a user and then viewing details, run the following powershell script (once connected using the previous office365 connection script)

get-migrationuser -status failed  | get-migrationuserstatistics | select identity,emailaddress,recipienttype, error,bytestransferred |export-csv c:\temp\migrationstatus.csv

I also have a simple loop that gets me the status once an hour. Obviously change the email address’s appropriately.

while (1)
{
$a=(get-migrationuser | out-string)
send-mailmessage -to [email protected] -subject “Company Migration Stats” -from [email protected] -smtpserver my.mailserver.com  -body $a
start-sleep -seconds 3600
}

Install telnet from the command line

pkgmgr /iu:"TelnetClient"

Wait a bit for the install to finish.
I do wish that pkgmgr would actually wait until the install has finished before coming back to a dos prompt as it’s annoying that you have no idea when the install has actually completed. On my machine it takes about 30 seconds.
I’m finding it hard to believe that my laptop did not have telnet on it – as I use it all the time. However whenever I install telnet from the dos prompt I always have to look up the syntax (and it’s still quicker than going into add/remove programs.
Hopefully this blog post will hit the search engines and therefore the syntax will be displayed on the first page rather than having to open a Microsoft page, scroll down and then view the syntax.

Pimp your Powershell Prompt

I use powershell a lot at work – I’m not a guru by any means and I often find it hard to remember the commands I have run in a session, either for future use or for documenting in my time sheet (which also acts as a point of reference for future helpdesk tickets).

When I started going through the Powershell in a month of lunches book (which I highly recommend or the Powershell v3 book) I decided to use the start-transcript commandlet to record all my powershell activities.  This worked very well until I would scroll through several screens worth and then forget what file I had saved my transcript too.  There was also the possibility of forgetting to transcript everything.

By using the powershell profile file I was able to enter the commands to automatically set the transcript to the current date. I was then able to modify the title of the powershell prompt to display the filename so I could always see where the file was saved with the added bonus of a variable being used if I ever needed to open the transcript

My next step was to include the time in the powershell prompt – this enables me to go back through the transcript and see how long it took to run the commands for my timesheet entries.  Remembering back to the good old dos days, I remembered the prompt command. A quick bit of experimenting with the Date command I had the current time displayed at the beginning on the Powershell prompt. Note this is displayed after the previous command is run, so technically it’s not the exact current time, but the time that the prompt was displayed on the screen.

The final profile script can be copy/pasted into notepad by typing in

notepad $profile

is as follows:-

cd \andy\powershellinamonthoflunches

$log="c:\temp\powershelllogs-" + $env.username + (get-date -uformat "%y%m%d-%H%M") + ".txt"
start-transcript $log
$host.ui.rawui.WindowTitle = $log

function prompt
{
write-host ((Date -uformat %T).ToString() + "PS " +$(get-location) + ">") -nonewline
return " "
}

This ends up with a powershell prompt that looks like the following. Hope this brief posting inspires you to change your powershell prompt to be even more useful for you.


Powershell prompt with the filename in the title and current time in the prompt


Fixed – Office365 journalling does not work for one user

I’ve been working on a case with Microsoft’s Office365 support for several weeks trying to find out why email sent *to* a particular user was not being journalled. All the other mail seemed to be journalled to the external recipient, email from the user was working, just not email to that user.

The experience was quite frustrating as Microsoft’s support were terrible at calling back and could not grasp the concept of email tracking. Their solution after making a change was to wait a day to see if it was fixed although it was quite apparent that the Microsoft servers were not even trying to send the email (by looking at the Trace Logs you can see what email was being sent and received).

After checking the connectors were setup, mail properly scoped, the user had no rules on their mailbox, Microsoft’s solution was to delete the mailbox and reset it up again.  Not so easy when the mailbox/user is federated with Active Directory and the user happens to be the owner of the company. That was not a conversation I was going to have with them!

The only thing that was different with this user was that in troubleshooting this issue we had set the user up to receive the journalling non delivery reports. I figured that if the emails were not being delivered, maybe sending him the errors would help. However no reports were being received either.  However, according to KB 2829319 this behaviour can be seen. Although I had removed the journal receipient in the web gui, the emails were still not being journalled until I added another external email address to the configuration using the powershell command set-transportconfig -JournalingReportNdrTo [email protected]

At this point, all the email started to be journalled.

Note that we only added the recipient into the mix when I was trying to work on the initial problem so it looks like this wasn’t the only fix.

The other thing we did was change the outboundconnector to be onpremises. Changing the setting in the GUI we then ran Set-OutboundConnector archivemymailconnector -routeAllmessagesviaonpremises $true.


These two combinations seemed to fix the issue.

One thing I also learnt was that it is really useful to send multiple emails between changes and keep the subject line starting the same. Use the date/time at the end of the email. That way you can sort the email logs by Subject and just pick out the ones you were working on. By having the subject start with zzz followed by Round X (ie zzz Round 1 – change connector – 1345pm and zzz Round 1 – change connector 1346pm ) then the results are likely to appear at the end of your mail logs if you sort by subject.  Sorting by Date was not always a good idea as mail flow could occur between mail coming into the server and mail leaving the server.


Fixed: Office 2010 installation with MAK key gives Error: Can’t decode PIDKey – Invalid digits! ErrorCode: 0(0x0)

After doing an administrative installation of Office Professional Plus 2010 for a client, I was trying to test the installation of office on a desktop machine but kept getting “Error: Can’t decode PIDKey – Invalid digits! ErrorCode: 0(0x0).” as the error message. I confirmed that the key was correct by doing a manual installation of the software and using the same product key that was successful. I was unable to find any useful pages on the internet with this error message so ended up logging a call with Microsoft Product Support to troubleshoot the installation.

Our troubleshooting steps were to remove the updates folder completely and try an installation – this worked so we knew the problem was in the updates directory. Recopying back the files from the extracted service pack 1 dvd worked successfully so the problem was either service pack 2 or the setup.msp file. I copied back the sp2 files and again the software installed successfully (note that having a virtual test pc makes these tests very easy. No uninstalling of office required!)  Again the installation was successful. I then copied the setup.msp file back into the updates directory and the installation failed again. As the configurations that are made in the setup.msp can either be set in the config.xml or group policy it was ok to proceed without using the setup.msp.

Full details of the log files and more information can also be found at the Microsoft forums where I posted the initial request for help.

Would/Should you block linkedin to your Exchange Server?

Apparently Linkedin now have a feature that allows users to provide their corporate passwords to a third party so the users can then send invites to other people in their office.  I really don’t see how this can Be A Good Thing 😉 – Paul Cunningham has a post on ExchangeServerPro on this feature and links to Adam Fowler’s post on how to block LinkedIn to Exchange. This is interesting as we’ve also seen this issue with Verizon doing something that we expect is screenscraping to provide email information to phones. Admittedly this was a while back but we have found it hitting the Exchange server so it will be interesting to see if this successfully blocks the server.

In a meantime, maybe it’s time to not only educate LinkedIn that this is a really bad idea but also your corporate users.

For what it’s worth the solution is to do the following:-

There are a few settings to check. First, under the Set-OrganizationConfig area, you’ll need to check that EwsApplicationAccessPolicy is set to ‘EnforceBlockList’. If it’s not, it’s going to be “EnforceAllowList” and you’re probably OK, as it’s using a whitelist for access to only what’s listed rather than a blacklist, to only block what’s listed.

Next, you need to add LinkedIn into the BlockList. This is done with the command “Set-OrganizationConfig -EwsBlockList LinkedInEWS

Sometimes it’s nice to see Microsoft add my information to their knowledge base.

This morning I was working on a Sites and Services issue for a client and part of the troubleshooting process was to run the Best Practice Analyzer on the domain controller. One of the results was to enable client fallback to the local netlogon and sysvol share after the local domain controller comes back online again. This reduces traffic across the network. I’m not quite sure why this is not enabled by default.

The BPA points to the technet article DFS-N: Client failback should be enabled for the Netlogon and SYSVOL folders on domain controllers.  Scrolling through the page I was pleasantly surprised to see my avatar at the bottom with a comment on improving the documentation with the actual registry keys that needed changing. Not only was my comment on the page, the original web page had been updated to include the information.

It’s nice to see content updated based on user feedback. It’s not nice to see that I had this problem 3 years ago 😉

Fixed: Facebook update constantly downloading and google play not working afterwards.

Last week my mobile phone started to constantly download a Facebook update which was draining the battery due to the constant downloading attempts. Trying to stop the download, I somehow managed to disable the download manager – this did fix the problem but for some reason also stops the Google play store from working. Every time I opened Google Play the application would just disappear from the screen. There was no forced close error message.  This was a bit of a problem as I had removed the Facebook app from my phone trying to stop the download and then was unable to reinstall it as the store would not open.

To fix this issue, Open Settings, Application Manager, scroll to All applications and then scroll down to the bottom of the screen. It is necessary to scroll all the way down as the disabled applications are at the bottom of the alphabetical list. Click on Downloads and then enable the application.

The app store will then start working and hopefully you won’t get the facebook update pushed down to your phone (I didn’t at least)

Trying to install System Center 2012

I have been battling this install for 2 days so far and not getting anywhere. There are a ton of sql prerequisites and the install error messages are very vague, like this message below:-IF
Surely it can’t be that hard to display the version of SQL server that is detected.

I’m currently following Harold Wong’s System Center install guide along with Matthew Peter’s guide and downloaded the Cumulative update 10 for SQL.
Attempting to install this patch on the server gives the error message below.
Screenshot - 1_3_2013 , 11_56_37 AM

The stupid thing about this is that neither 10.51.2500.0 or 10.1.2531.0 are valid sql version numbers. Select @@version returns the accurate 10.50.2500.0 which is sql 2008 r2 sp1 but it ignores the previous cumalative update that I’ve already installed.

So far my hopes for System Center have been severely dashed and buried in the ground. It’s a good job we don’t have windows in this office or I’d be tempted to set fire to the server and chuck them out of the window.

It’s been a long start to the new year.